Time management and time efficiency when off the bike is at least as important as cycling speed in bikepacking and ultra-distance cycling races in which the clock never stops. This page contains information about how to measure your time efficiency and how to improve it.
Page Contents:
Introduction
I’ve read several reports from people who spend fewer hours per day on the bike than I do (both those who ride slower and faster) but who day after day end up with far fewer hours to sleep at night. This suggests that their Time Management and Time Efficiency during the day could be improved. Although everyone tries to improve their cycling speed through training and possibly by buying lighter, more aerodynamic, possibly faster equipment, most people underestimate how important the time spent off of the bike is, especially in a self-supported race. Apidura have also posted a very useful post on being efficient with your time.
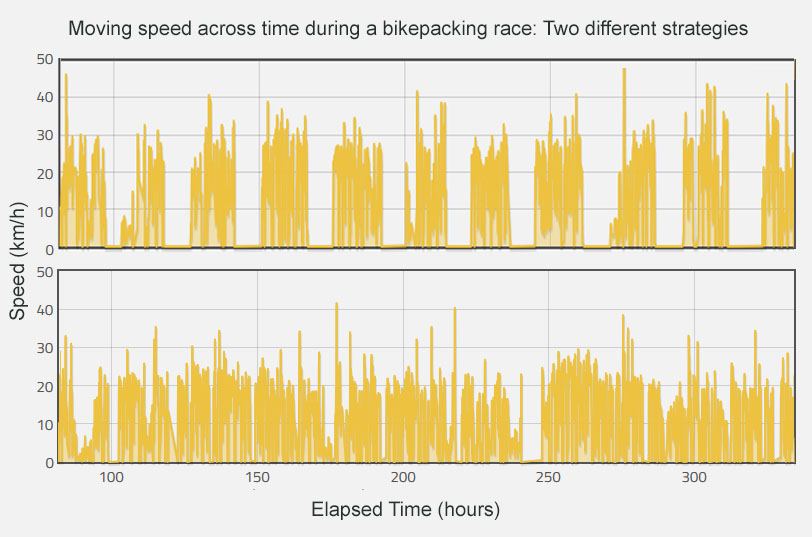
Here are two examples from the 2017 Transcontinental Race (TCR) showing moving speed across time. The person in the upper graph tends to ride faster than the person in the lower graph but he takes regular, long breaks while the person in the lower graph takes more frequent, less regular and much shorter breaks and rides significantly more slowly when on the bike (note that all speeds are underestimated slightly due to using tracker data to estimate distances traveled).
Both individuals finished the race near the middle of the field, showing that two very different strategies worked well for different people. This highlights how important time management and strategy is and how it is something that you should consider, plan and practice before starting a race.
A good way to improve something is by measuring and recording it, so that is what I recommend doing as the first step towards improving your time management and efficiency. The question then becomes how to measure this concept, which I attempt to answer first. Further down the page, I describe time management techniques and strategies.
Measuring Time Efficiency
Moving Percentage
Total time stopped during the ride is the simplest metric to use, but that is quite meaningless unless it is compared to the total elapsed time. I therefore recommend computing the percentage of time spent moving (moving time) compared to the total time elapsed between the start and end of each day’s ride (elapsed time). This metric doesn’t have a standard name, probably because most other types of races don’t include planned stops, but stopping is inevitable in self-supported races, so the moving percentage is a useful performance measure.
Moving Percentage = Moving Time / Elapsed Time
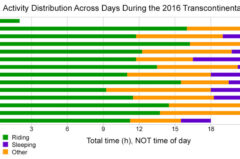
The moving percentage varies greatly between individuals and from one day to the next for a given individual, possibly even more so than average cycling speed. Having a moving percentage of at least 80% (e.g., 12 hours out of 15, or a total of 3 hours of stops) is a reasonable goal to have for a typical rider. A value of over 90% is difficult to maintain all day long but is possible for the most efficient riders (who may try to ride for at least 18 hours out of 20 hours elapsed time every day). A moving percentage of below 70% probably means that you are in tourist rather than racing mode or you’ve had some serious mechanical delays. 75-85% is the typical range for most riders.
Unfortunately, I’m not aware of any bike computers that offer moving percentage as a standard option to display. Many computers will display the total time elapsed since the start of your ride (including stops) in addition to your moving time (not including stops); but make sure that your computer doesn’t go to sleep when stopped so that it counts all of the elapsed time. You can then compare these values to get the moving percent by doing a mental calculation or with the calculator on your smart phone. More simply, you could subtract moving time from elapsed time to get stopped time and try to keep this value below the time that corresponds to your target moving percentage. For example, to maintain a moving percentage of 80% you could aim for 1 hour of total stops for every 4 hours of moving time (or 5 hours of elapsed time).
My preferred way of continuously tracking my moving percentage is to use a Garmin computer that allows custom data fields to be added through their ConnectIQ system. I wrote a detailed blog post describing exactly how to do this.
How much of a difference will an improvement in moving percentage make to a typical ultracyclist? If you can average 9 hours for the total length of your overnight stops (from getting off of the bike in the evening until getting back on in the morning) then that leaves 15 hours for each day’s ride. If your average riding speed is 24 km/h then having a moving percentage of 85% will allow you to cover a very respectable 306 km per day. In contrast, someone who only has a moving percentage during those 15 hours of 75% will cover just 270 km per day, or 36 km less. The person with a 75% moving percentage would therefore take over 1.5 days more to complete a 4000 km route than someone with a moving percentage of 85%. Or, if the person with a 75% moving percentage still wants to average 306 km per day then they will need to have 17 hour-long days, and so have 2 hours less for each overnight stop than the person with an 85% moving percentage.
When tracking your moving percentage, you’ll soon notice that the shorter the ride, the easiest it is to maintain a higher value. In addition, an all-day ride from your home is a very different matter to one of the days in the middle of the second week of a bikepacking race during which you’ll be trying to find supplies and services in places that you are unfamiliar with and also while trying to keep your body and bike running after thousands of kms on the road. A value of 90% may be quite achievable in the former case (and even higher for shorter rides) whereas 80% can be a challenge in the latter, but the skills you acquire trying to optimize the value at home should still transfer to the race, even if the values become slightly deflated.
Overall Average Speed
Although moving percentage is not directly available on most bike computers, you can indirectly keep track of it by asking your computer to display your average overall speed that includes all stops, rather than letting it automatically pause each time you stop and so only displaying cycling speed. Whether or not to pause the speed timer automatically is an option on many bike computers, so you can choose between the two measure of speed – overall speed or cycling speed.
Personally, I prefer to measure my performance by looking at my average cycling speed (not including stops) and my moving percentage separately rather than combining them into this single metric of overall speed (including stops). However, overall speed is a very important measure, particularly for estimating the time when you expect to arrive at a certain location. For instance, you might find that you can maintain an overall speed including stops of 20 kph (equivalent to having a cycling speed of 24 kph and a moving percentage of 83.3%). You’ll then know that if your target location for the end of the day is 200 km away then it’s going to take about 10 hours to get there.
Overnight Stops
I prefer not to include overnight stops in my moving percentage and instead reset my computer when I get off of the bike at my overnight stop and start a new ride the next morning when I get on the bike. Minimizing the length of overnight stops is certainly important, so I do note down the length of each one, but to me this is a completely different topic and requires different strategies compared to minimizing stops made during each day’s ride.
Not including overnight stops in my moving percentage means that the value is affected by whether I eat breakfast or dinner during a stop that is part of the ride (and so it affects my moving percentage) or during my overnight stop. However, in the end my race time is the same and I adjust my goals for each metric accordingly, so there is nothing to be gained by doing it either way, and you may choose to do things differently.
My assessment of each day’s performance therefore includes looking at the average cycling speed, moving percentage during the ride, and the length of the overnight stop. Total distance ridden that day is also important, especially to determine whether you are staying on the schedule that you’ve set yourself, but a single day’s distance can be artificially inflated or deflated depending on the time that you start or finish each consecutive day, thereby making some “days” longer than 24 hours and other days shorter (this is discussed further in the Schedule & Goals page).
All Measures
In case you lost track of what each of these metrics referred to, this table gives a concise summary. The measures that I consider to be the most important are starred and written in bold.
| Metric | Definition |
| Elapsed Time | Time since leaving previous overnight stop |
| Moving Time | Time spent moving since leaving previous overnight stop |
| * Moving Percentage * | Moving Time / Elapsed Time |
| Distance Covered | Distance covered since leaving previous overnight stop |
| * Cycling Speed * | Distance Covered / Moving Time |
| Overall Speed | Distance Covered / Elapsed Time |
| * Overnight Stop Length * | Time between arriving at the overnight stop until leaving |
| Sleeping Time | Time spent asleep during overnight stop |
| * Rate of Progress * | Average distance covered per day (the most important metric) |
Time Management
Measuring your time efficiency is just the first step towrds improving your efficiency. Certain time management techniques and strategies that are presented below should help you to optimize these metrics and how your choice of equipment also has an effect.
Part of the attraction of bikepacking races for me is experiencing life intensified to a degree that cannot be experienced in regular life or when doing normal bike touring. The most obvious aspect is that the distance ridden day after day is far greater than you’d achieve in any other situation, and so the amount of scenery passed is on a different scale, even though you don’t get much chance to enjoy it properly. The less obvious aspect is how you can become obsessed with making sure that everything that you do on and off of the bike is helping to achieve your goal. Mundane tasks like personal hygiene become optimized to not waste any time, and you start to feel guilty if you relax too much and take too long enjoying a meal because every wasted minute must be justified.
It’s difficult to maintain a focus on time efficiency throughout the entire race, so to avoid becoming mentally overwhelmed by it, I recommend switching off and forgetting about the race for a few hours or a day when necessary. However, if you want to do well in the race then you need to learn how to be efficient and economical with your time, so keep this in mind when on training rides and make such behavior become natural so that you don’t need to think about it during the race.
A basic tip is to not stop until you have multiple reasons to do so. If you need to use the toilet, but it is not very urgent, then wait until there is something else that you also need to do like put on a jacket, get some food from your rear bag, etc. If you have several things that you plan to do when you stop, then try hard to remember them all before getting moving again – it’s very easy to forget something and then need to stop a second time.
A method used by James Hayden, winner of the 2017 TCR, is to start a stopwatch timer on his wristwatch whenever he stops. He can then keep track of how long he’s stopped for and it’s a reminder for him to not waste too much time.
When you do stop, make sure that you don’t leave anything behind. I’ve heard many stories of riders leaving important items (wallet, phone, passport, etc.) behind in hotels, restaurants, gas stations, etc. and needing to ride long distances to retrieve them. You should keep these items somewhere that is easy to access and easy to check while on the bike and get in the habit of checking that you have them each time you leave a stop.
Rider Comfort has a large impact on how much time can be spent on the bike each day, so make sure that you’ve optimized your equipment in that respect.

A lot of time can be lost checking social media and the race tracker website during the race. I don’t encourage doing this while riding, and although it can be useful for motivation and psychological support, it’s best to minimize the amount of time that you devote to it if you want to reach the finish in a decent time. You can tell everyone all about your trip and read all of the messages you’ve missed after the race is over. In contrast, you only get one chance to take photos of memorable events and locations, and after the race is over you’ll probably be thankful that you occasionally stopped for 30 seconds to get a nice photo, otherwise it’s easy to forget all of the beautiful scenery that you rode through.
Some people recommend trying to never sit down in a chair – always be on your bike, lying down asleep, or walking somewhere. This implies that you should eat all of your meals while on the bike, as well as doing many other tasks while pedaling. I’m not as extreme as this – I tend to sit down to eat my main meals, but I try to eat most snacks while on the bike. You should obviously wait until you are on a quiet and safe section of road to do anything else while riding. Trying to eat everything while riding does limit your food choices, which the GCN team tried to highlight in the video below, but I think they actually did a good job at demonstrating what is possible if you try.
There is a page devoted to the broader topic of Nutrition Strategies that includes many more tips about how to find food without wasting much time. In addition to modifying your behavior to increase time efficiency, you should also chose your equipment with this goal in mind.
Equipment Choice
Despite lay beliefs, objective modeling of cycling speed shows that equipment weight actually has a very small effect on average cycling speed, even on mountainous courses (see the The Actual Effect of Weight on Cycling Speed page). Despite this, most people focus on weight when deciding what equipment to bring and generally ignore how their equipment might affect their moving percentage and overnight stop length. I do not assume that the examples that I give below are going to work for everyone, but they should help to illustrate the idea that time efficiency should be one of the most important criteria when choosing equipment.
The first example is Water Storage. My primary reason for carrying three 1-litre water bottles is to maximize my moving percentage. With the bottles filled at the start of the day, I often don’t need to stop for 6+ hours to refill with water, and if I have some snacks in my bags then I won’t need to look for food during that time either. Refilling water bottles doesn’t take long, but sometimes looking for a place to get water and possibly buying it can take considerable time that will add up during the race. A secondary reason for carrying so much water is that I won’t have to ration my water even in hot conditions, so I should be sufficiently hydrated to maintain my cycling power. In regions where finding water is easy or when I know I’ll be stopping for other reasons soon then I don’t fill all bottles, so I’m not always carrying the extra weight.
The next example is sleeping equipment. Sleeping outside can save significant time and how much equipment you are comfortable sleeping outside with is a matter of personal preference (see the Sleeping Strategies page), but you should at least make sure that your sleeping gear takes a minimal amount of time to setup and break down. I previously used a lightweight tent that took a frustratingly long time to setup and re-pack; I’m much happier with the simple bivvy bag that I now use.
Bags
I find that I can save time by having my bags well packed, organized, with everything easy to access, and this is aided by my choice of bags (see the Bikepacking Bags page). The primary bag in a typical bikepacking setup is one that straps to the seatpost and saddle rails and extends backwards. These generally have no pockets and can only be accessed from one large opening at the back, which doesn’t suit my style. My primary bag is in a similar position but it attaches to the top of a rear luggage rack. It has two side pockets and the top of the main compartment opens completely, so I can access everything easily. This setup is slightly heavier than the lightweight bikepacking bags and not all bikes can be adapted to take a rack (but many can take a seatpost-mounted rack); for me the added convenience of this type of bag more than makes up for the slight weight penalty.
Regardless of the bags you choose, you should make sure that the gear that you’ll need during the day is easy to access. I put all of my warmer and wet weather clothing in my frame bag so that I can reach it while riding. For the same reason, I always have a good stock of snacks in a top tube bag behind the stem.
Choose bags that are more than big enough for what you want to carry. Arranging everything in your bags just perfectly, compressing your sleeping gear and clothing as much as possible, etc., just to get your bags closed can waste a lot of time, so you should consider buying a bigger bag or adding another bag somewhere. Alternatively, you could take less stuff. And don’t forget to leave space to carry a decent amount of food so that you don’t have to find a shop every time you want to eat and you don’t have to go hungry when you don’t find anything open in the town that you were aiming for.
Bike Parts & Tools
I choose my Bike & Bike Components based on proven reliability before considering factors like weight because bike repairs can cost a lot of time during the race. Working in a bike shop gives me a better insight into what can go wrong and what designs are more prone to failure than others. The general trend is that options in the middle of the price range are more reliable than many high-end or cheap models.
For Repair Tools, I originally carried a minimal set that was the smallest and lightest possible. I soon realized that carrying a slightly larger but far more practical set is more than worth it so that adjustments and repairs are quicker, easier and more reliable to do. For a pump, why save 100 grams to have something lightweight if it is going to cost a few extra minutes to repair each puncture? (I’ve had more than my fair share of punctures during races despite using decent tires and sometimes tubeless tires.) Having a larger pump with a small pressure gauge like the Topeak Road Morph G (Amazon) also means that I can keep sufficient pressure in my tires to guard against pinch flats and to optimize rolling resistance, thereby saving even more time (see the How Tire Rolling Resistance Affects Cycling Speed page).
I prefer to have full fenders on my bikepacking bike. I’d like to know how much of a difference they make to the bike’s aerodynamics, but I would guess not much and I do know that they don’t weigh much. The big advantage is that I can keep riding and be more comfortable while doing so when it’s raining or even when the road is just wet. There are models of fenders that will fit almost any bike, even pure racing bikes with narrow clearances. Ultracycling races invariably end up going through some significant rain somewhere along the course. Riding in the rain is physically and mentally much tougher than riding in good weather, so anything that can be done to minimize the problems and to stay on the bike for longer in such periods is something that I consider to be worthwhile.
I could list many more examples, but these should be sufficient to show that equipment choices may affect time efficiency more than they affect cycling speed, so this should be factored into decisions about what to bring.
Last significant page update: November, 2018
This page is in the Mental Approach & Strategy section. The next page in this section is: