Many aspects are important when optimizing your riding position for long-distance cycling and bikepacking. Saddle position, crank length, cleat placement, handlebar position and aerobar position are all discussed on this page.
Page Contents:
Related pages:
- Bike Frames & Brakes
- Saddle Comfort: Saddle, Shorts & Tires
- Hand Comfort: Handlebars, Aerobars & Gloves
- Foot Comfort: Shoes & Pedals
Frame Size
It’s difficult to optimize your riding position if the bike’s frame isn’t the right size for you or adapted to the style of riding you want to do because adjusting or changing components can only make a limited amount of difference. How bike frames are measured and the main differences between different styles of bikes is covered on the Bike Frames page. There are various ways to determine what frame size is right for you, most of which are summarized in an article at Our Bike Guide.
The Efficacy of Visiting a Bike Fitting ‘Expert’
If you don’t have much of an idea about where to start with optimizing your position or what aspects to look at, then visiting a bike fitter should help you to get closer to a reasonable position.
Many people who do bike fitting are not experts, they are typically bike shop employees or owners who’ve taken a short course and bought some equipment and now implement the bike fitting methodology that was developed by one of several major bicycle brands. Even visiting two fitters who use the same fitting methodology can yield quite different results and the differences will be even more pronounced if the fitters are using different methodologies or theories. It is impossible to say which of these methodologies is better and even harder to say which practitioner of a given methodology should be preferred.
Some bike fitters may be able to help if you have a specific fit issue that you need to address. However, you should still be cautious about taking their advice because most bike fitters are not as knowledgeable about biomechanics and physiology as many of their clients assume.
In addition to the lack of consistency between bike fitters and the fact that very few of them truly understand the biomechanical demands of cycling, there is the further issue that not many of them understand the specific needs of an ultra-distance cyclist.
Even if you can find someone who does understand your needs, then the biggest mistake you can make is to take the position that they recommend as being the final word. You should instead only use their advice as a suggestion and then experiment with different variations during training and pay close attention to how your body responds.
If you feel that you already have a reasonable riding position, then do not be afraid to experiment with variations to find out if they feel better or worse in certain situations. In addition, our bodies change over time and the position that you were happy with a few years is not necessarily still ideal for your body today.
Saddle & Pedal Position
Shoes, Pedals & Cleats
The cleats on your shoes should be assessed before looking at other aspects of your position. This topic is covered on the Foot Comfort: Shoes & Pedals page.
Saddle Height & Setback
Choosing a comfortable saddle is covered on the Saddle Comfort: Saddle, Shorts & Tires page. The most basic methods of determining saddle height involve measuring your leg inseam and applying a formula to determine the height (e.g., the LeMond method uses a factor of 0.883, see this BikeRadar article). This type of method ignores individual differences in the amount of ankle angulation, foot length, cleat position, and the person’s overall flexibility, so most modern bike fitters use more dynamic techniques that assess the angle of the knee at the bottom of the pedal stroke while pedaling, which is often recommended to be about 35 degrees. However, several ultra-cyclists have reported preferring to lower their saddle height by 5-10 mm for ultra-distance events compared to what they would use for shorter rides to prevent ligament and tendon problems, myself included.
Saddle setback is the horizontal distance that the saddle is behind the bottom bracket or crank axle. This can be varied by moving the saddle forwards or backwards in the seatpost clamp. If you want more adjustment than is available on the current post then you can change the seatpost to one with a different amount of setback. When the cranks are horizontal to the ground, placing the front knee over the pedal spindle is the classic method used to determine the setback for road cycling. This norm is reinforced by UCI rules that mandate the minimum setback for professional cyclists, but the topic is strongly debated (e.g., see the article by Keith Bontrager).
Triathlon rules are more relaxed than the UCI’s, so many triathletes have their saddles much further forwards to allow them to have a lower handlebar height while still having the same amount of bend in their hip. Such a forward and low position may not work for ultracyclists because it puts more weight onto the hands, and the neck must be bent more to look up the road. The hands and neck are common sources of troubles for ultracyclists (see the Nerve Problems section below), so moving the saddle further forward may not be ideal.
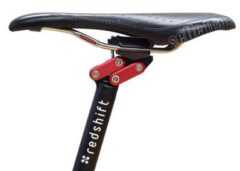
One possible compromise is to use a RedShift Dual-Position seatpost, as shown in the photo, which makes it possible to move the saddle between two setback positions while riding. The forward position is designed to be used when riding on aerobars and the rearward position when holding the regular bars. I’ve written a complete review of the post on the Ride Far Blog, I found it to work very well with a few caveats, see here: RedShift Dual-Position seatpost.
Crank Length
Saddle height is normally set to achieve a suitable knee extension at the bottom of the pedal stroke, but the knee angle at the top of the pedal stroke is almost never measured. This upper angle is controlled by the length of the crank and is something that I am quite sensitive to. Research has shown that most individuals’ power output doesn’t change across a broad range of crank lengths, but that doesn’t mean that it doesn’t affect comfort or contributes to over-use injuries for long-distance cyclists.
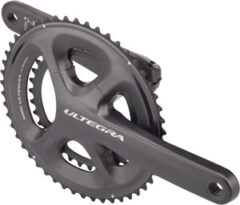
I’m quite short (my saddle height is 70.5 cm and I ride a 52 cm frame) and with the shortest standard-length cranks of 170 mm, I find that my leg compresses too much at the top and I’m more comfortable using 165 mm cranks. It’s the diameter of the pedal circle that matters so the highest point actually differs by 10 mm for a 5 mm difference in crank length if the extension to the bottom of the stroke is kept constant.
I find it surprising that standard frame sizes vary by up to 25% (50 to 63 cm frames), and people’s saddle heights vary by a similar amount, while the cranks typically sold with those bikes vary in length by just 3% (170 to 175 mm)! A slightly wider range of crank lengths is available to purchase separately but the typical range is still only 9%: 165 to 180 mm, and it’s odd that the longest and shortest lengths that do exist are not fitted as standard on the largest and smallest frame sizes.
I’m not the only person to question why crank length is not proportional to leg length/frame size, see Sheldon Brown, Lennard Zinn, and others. If you’re not in the middle of the bell curve and riding a 55-57 cm frame then a different crank length may be something that you want to experiment with.
Many experienced long-distance cyclists have discovered that using shorter cranks helps to reduce the chance of developing joint pain. Shorter cranks allow the joints to experience a narrower range of motion on each pedal revolution, thereby putting less stress on those joints, in particular the knees.
I’ve made a lengthy blog post about Crank length and comfort for long-distance cyclists which includes formulas for determining your recommended crank length and links to other articles on this topic.
Crank length is addressed in the Francis Cade video below that features an extremely knowledgeable bike fitter. He encourages people to experiment and states that using shorter cranks can reduce heart rate, thereby reducing fatigue levels while at the same time increasing comfort due to causing less hip rotation. The second video by Peak Torque shows how changes in crank length affect knee and hip angles.
Joint Pains
Pains in the joints, most commonly knees and Achilles tendons, can occur despite the best efforts to find a comfortable saddle position and cleat adjustment. If such problems occur during training, you should seek advice on how to avoid and manage your specific problem, a reasonable overview of possible problems and causes is given in the second half of this video and see this and this BikeRadar article. If problems arise during a race then you should try to manage them so that they don’t become too serious. Such problems occur more easily in cold weather, so using a pair of knee or leg warmers is a good idea; see the Bike Clothing page.
Some racers have successfully resolved knee problems that arose during a race by stretching arm warmers tightly over their knees to give some compression and stability; some people use kinesiology / athletic tape (see this GCN video). Knee pain can also sometimes be treated with ice (which may be available at restaurants or hotels), but this should only be used at the end of the day when you’ve finished riding. I’ve successfully made knee pains go away during a race once by changing my saddle height by 5 mm and another time by rotating my cleats slightly. This video contains further useful tips:
Possible treatment methods for Achilles pain include taking anti-inflammatory drugs and doing Achilles stretching exercises several times a day. Some people do self-massage while riding by squeezing and massaging the tendon between their thumb and index finger. Applying kinesiology tape may also help (see this GCN video). Riders have reported that combining these methods with taking it easy when feeling the pain often results in the pain going away after a while.
Handlebar Position
Having determined the relative position between the saddle and pedals, attention should be moved to the position of the handlebars and aerobars relative to the saddle. This is important for ultra-distance cyclists to prevent nerve problems from developing in the hands and neck.
Nerve Problems

Hand problems can range from mild pain in the palm or fingers, to numbness of one, two, or all fingers, and sometimes also loss of strength. This condition is caused by pressure on the ulnar nerve and is even known as cyclists’ palsy or ulnar palsy. It is an extremely common problem for ultracyclists, and can cause problems during a race and severe cases (which are not uncommon) take months to return to normal.
Neck, shoulder, and back aches are also quite common and are affected by the position of the handlebars. A mildly aching neck is not a big problem but in some cases, neck pain suddenly develops into a far more debilitating condition called Shermer’s Neck in which the neck muscles completely fail to support the weight of the head (the condition is named after a racer in the early years of the Race Across AMerica, RAAM).
The only known cure for Shermer’s Neck is to stop riding for at least a couple of days. Several people have fabricated devices that support their head, often using tape to attach some form of pole or stick to the head and torso, or using something that goes around the neck like a neck brace. It is dangerous to continue riding with such a condition due to having a reduced angle of vision. If you have a history of neck problems, then see this article at ultracycling.com for a preventative massage regime that may be started several months before the event.
Having a handlebar position that is not too aggressive and using multiple positions can both help to avoid these nerve problems from arising or from becoming severe.
Handlebar Reach
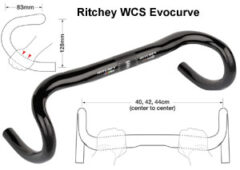
The shape and size of different handlebars are covered on the Hand Comfort: Handlebars, Aerobars & Gloves page. Handlebar reach is the distance from the saddle to the handlebar. This should be set so that the rider’s hands naturally rest on the brake lever hoods when using a drop handlebar.
If you find that when riding you tend to grab the bend of the bar just behind the brake hoods then maybe you’d be better off with a shorter stem to bring the bars closer. If you tend to rest your hands on the raised, top part of the brake hoods instead of in the dip/valley-shaped section of the hoods then you might consider trying a longer stem. It’s not advisable to move the saddle fore and aft (i.e., change the setback) to alter bar reach because setback should be set based on other considerations (see the Saddle Height & Setback section above). If you bought your bike from a local bike shop then they should allow you to test a stem size on a new bike and change it if needed for no extra cost.
Because it’s easy to adjust the saddle height over quite a large range with modern compact geometry frames (see the Bike Frames page), it’s more sensible to choose a frame size based on the desired height and reach of the handlebars. Bike frames with “endurance” geometry tend to have higher head tubes and shorter top tubes to make them more comfortable for long-distance cycling; in addition, larger frames also have taller head tubes so if you are between two frame sizes and want a reasonably high handlebar then this will be easier to do on the larger frame (with a slightly shorter stem to compensate for the increased reach).
GCN explain some of the factors that determine handlebar reach in this video, which also includes information about saddle position:
Handlebar Height
Optimal handlebar height depends on the individual because someone who has better flexibility will be more comfortable riding with a lower handlebar height than someone who has reduced flexibility, but it is also partly determined by the type of riding the person intends to do. A low, aggressive riding position is generally not comfortable for long distances because it puts more weight on the hands and forces the neck to have to be bent up more to see down the road properly. This therefore increases the chances of developing nerve problems in the hands or neck.
People who have their handlebars relatively low tend to spend almost all of the time riding on the hoods because the drop section is too low down to be comfortable. Putting the bars higher doesn’t necessarily mean that you will be less aerodynamic if it means that you are more comfortable when using the drops than you were with the bars lower, and so you spend more time in that more optimal position. Handlebar height is therefore something that you should experiment with to find what is the most comfortable for you while still allowing a reasonable proportion of time to be spent using each hand position, including the drops.
The easiest way to move the bars up or down is by changing the order of the spacers and the stem. If there are no more spacers that can be moved then you can try to flip the stem upside down to change the angle. If neither of these methods yield enough adjustment then consider changing the stem to one with a more extreme angle. After doing any of these adjustments, you will need to re-adjust the preload on your headset bearings, so see this GCN video.
Because a bike’s head tube is not vertical, moving the stem up and down also changes the reach slightly, as does using a stem with a different angle. Online tools to compute the changes in geometry between different stem lengths, positions and angles are at bikegeo and slowtwitch.
Increasing the reach or height of the bars may require longer cables and housings. I like to have the capacity to raise my bars if a problem develops during a race, so I leave enough spacers above the stem or have a negative stem that I can flip over and I leave the cable housings long enough to accommodate such changes.

Aerobar Position
Using aerobars can greatly increase comfort and help to avoid hand problems, as well as improving aerodynamics (see the How Air Resistance of the Cyclist Affects Cycling Speed page). Specific models of aerobars are discussed on the Hand Comfort: Handlebars, Aerobars & Gloves page.
One complication with using clip-on aerobars in addition to standard drop bars is that it can be difficult to get the drop bars at an optimal height while at the same time optimizing the clip-on aerobar height. Often either the aerobars end up too high, or to get them at the best height, the drop bars must be put quite low. To minimize such problems, I recommend using aerobars that have the extensions mounted inline with the base bar or under the base bar, so that the elbow supports can be as close as possible to the base bar, see the diagram on the right.
As well as the height of the aerobars being important, the distance between them and the saddle determines how close the elbows are to the elbow pads. Having the pads closer to the elbows allows the rider’s weight to be better supported on the skeleton without needing to use the muscles so much, so it’s preferable for long-distance comfort. As described in the Saddle Height & Setback section above, using the RedShift Dual-Position seatpost makes it possible to move the saddle between two setback positions while riding, one of which brings the rider much closer to the aerobars, which some people find increases their comfort while in that position.
Finding the right style, shape, width, and height for your aerobars isn’t something that can be done quickly, so you should experiment with this very early in your training to find out what works best for you. You also need to get familiar with handling the bike while on the aerobars because it’s quite different to when holding the regular bars, but once you get comfortable then it’s not a problem. Spending significant time on the aerobars during training will also help your flexibility and core strength to make it easier to hold that position for longer even when you’re tired.
Shorter & Taller Riders
Bike frame geometry tends to be designed around a bike that fits an average-size white man, which for a road bike is most often a 56 cm frame size. The geometry of other frame sizes is adapted to try to achieve similar ride and handling characteristics, but once the extreme ends of the scale are reached then compromises often have to be made. This often occurs for frame sizes smaller than about 52 cm or larger than 60 cm. People needing frames in those sizes may profit from a few specific bike fit tips.
Emma Pooley does an excellent job of describing the problems and possible solutions for people trying to get very small frames to fit properly in this GCN video. I particularly like her encouragement for small riders to consider using smaller wheels and smaller cranks to avoid some of the compromises that are needed when designing a bike around parts that are inappropriately sized.
Lennard Zinn knows a lot about how to make a bit fit a very tall rider and has shared some tips on his VeloNews Q&A column here and here. Zinn also makes custom bikes that are specifically designed for tall people and also offers bikes specifically designed for short people. Many other custom bike frame builders will also be able to build something suitable, including Clydesdale Bicycles for taller riders.
Last significant page update: November, 2018
This page is in the Rider Comfort section. The next page in this section is: