Active lighting for cyclists means light sources that actively transmit light / are powered and so are used To See and To Be Seen. In contrast, passive lighting refers to reflective and fluorescent surfaces that passively reflect light coming from elsewhere and so are only for used To Be Seen. For maximum effect, it is best to use both active and passive lighting when cycling, especially in low light conditions and at night.
Page Contents:
Inadequate and Inconsistent Laws
Almost all countries require front and rear lights to be used when cycling in the dark or low light conditions and lights on the front of the bike must be white and those on the rear must be red. However, most bike light regulations are generally woefully inadequate in terms of the required levels of lighting power, especially for front lights, and the types of lights that are allowed.
I live in the center of western Europe and frequently pass through different countries that have slightly different laws for bicycle lighting. I tend to ignore the laws and instead base the choice of my lighting setup on practical considerations, which I explain below. Some of these countries forbid the use of flashing bike lights, but such lights can significantly increase safety and I’ve never met a law enforcement officer who was concerned about what type of lighting I had as long as it was effective.
Functions of Bicycle Lights
Most other guides to bike lights distinguish between two functions of bike lights: lights to see with and lights to be seen with, but it helps to subdivide the second function into two:
- 1: Illuminate the road ahead – Lights need to illuminate the road ahead sufficiently to allow the cyclist to ride safely at a reasonable speed.
- 2: Attract attention – Lights need to make drivers in the vicinity aware of the cyclist.
- 3: Communicate position and speed – Lights need to allow drivers to judge the position of the cyclist on the road, distance away, trajectory and speed.
Some types of lights are better at achieving certain functions and other lights are better at achieving other functions. There is therefore no perfect light and using a combination is often the most effective strategy.
Returning to the list of all possible Causes & Types of Bike Crashes on the first page of this section, having lights that satisfy Function 1 well should help to avoid crashes of Types 2a, 2b, 3a and 3b in which the cyclists is mostly at fault. Lights that satisfy Functions 2 and 3 well should help to avoid crashes of Types 1a and 1b in which a driver is mostly at fault.
Function 1: Lights That Illuminate the Road
A reasonably powerful and well-focused light is needed to satisfy Function 1: Illuminate the road ahead. Some very good dynamo-powered and battery-powered options are presented on the page in the Bike Accessories section dedicated to Headlights for Bikepackers & Ultra-Distance Cyclists. This page is in the Rider Safety section, so mostly focuses on lights that achieve Functions 2 and 3, which concern being seen.
Function 2: Lights That Attract Attention
When there is ambient lighting, meaning during the daytime or at night in an urban environment with street lights, there are plenty of cues to satisfy Function 3 and once drivers have noticed a cyclist then it’s not difficult for them to judge the cyclist’s position, distance, trajectory and speed. In these situations, Function 2, attracting drivers’ attention, is the main function that bike lights need to serve for a cyclist to be seen.
Flashing lights attract human attention better than solid lights and so are the most effective type of lighting to achieve Function 2. Solid lights can be reasonably effective for this purpose (and Passive Lighting to some degree), but solid lights are not as effective as flashing lights for an equivalent amount of lighting power or battery life. However, flashing lights are not sufficient in all situations because they do not satisfy Function 3 very well (see below).
How well different flashing lights satisfy Function 2 depends mostly on the strength of the light and partly on the flashing pattern. Most lights have multiple flashing modes, so how should you choose between them?
Flashing modes that simply alternate between one LED being illuminated and a different LED being illuminated or make a spatial pattern can look impressive when reasonably close, but from a distance they usually look the same as a single LED being constantly illuminated. I therefore prefer flashing modes in which all LEDs in the light turn on and off or dim together to have the maximum possible impact.
Flashing patterns that have an irregular frequency may be more effective at attracting attention than simple on-off-on-off regular patterns, which is why Exposure Lights developed their DayBright mode, as shown in this video:
Some drivers complain that flashing bicycle lights are annoying. My response to this is that dying is a lot more annoying. Because the most common excuse for drivers hitting cyclists is SMIDSY (Sorry Mate, I Didn’t See You), I can tolerate annoying a subset of drivers if it means that I’m more likely to survive the journey.
However, I do find that some of the highest-power lights are a bit excessive in flashing mode at night-time, and medium-powered models can be just as good at attracting attention while not being overly annoying to other road users. Some newer lights have extra-strong flashing modes that are designed specifically for use in bright daylight that are more aggressive and other flashing modes that are better at night-time because they are not as harsh but still attract attention.
Function 3: Lights That Communicate Position & Speed
Although flashing lights achieve Function 2 very well, attracting drivers’ attention, they don’t achieve Function 3 very well, allowing drivers to judge the position of the cyclist on the road, distance away, trajectory and speed. Solid lights are essential for achieving Function 3 when there are no other light sources around. When there is sufficient ambient lighting from the sun or street-lights, solid lights are not essential, but when those other sources are missing and cyclists are riding on unlit roads in the dark then they must have solid lights front and rear.
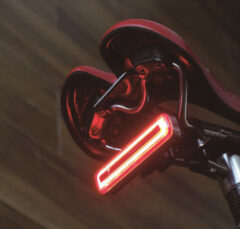
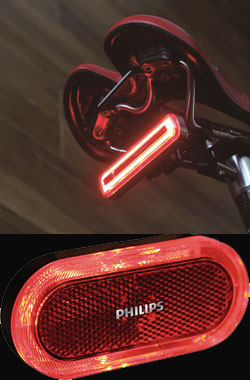
Solid lights vary considerably in how well they satisfy Function 3. Lighting power is reasonably important, but the shape and size of the light is also important. A solid light with a single point source is not particularly effective at communicating distance and speed information, regardless of how strong it is. I therefore prefer solid lights that have a larger illuminated region instead of a single point. The image on the right shows two good examples of this, with the Moon Nebula battery-powered model at the top (Amazon) and the Philips Saferide dynamo-powered light at the bottom (Amazon). Alternatively, two separate solid lights placed a reasonable distance apart could be used instead of one wider light.
Reflective surfaces, a form of Passive Lighting, can also be helpful when placed at various places around the bike to give some idea of the size and shape of the vehicle and how it is moving. However, passive lighting only serves as a supplementary method of illumination rather than as a primary method.
When to Use Each Type of Light
Because each type of bike light, flashing and solid, is better at achieving a different function, it’s a good idea to equip your bike with multiple lights on the front and rear. But exactly when should each type be used?
I use my flashing lights all the time in any low-light situations, but I often leave my solid lights turned off until night-time. During the night in urban areas I ride with both types of lights illuminated on the front and rear, but when riding on unlit roads I often turn off the front flashing light because it can be slightly distracting for me.
Personally, I tend to not use lights in bright daylight. Even so, I can understand why some people choose to have their bike lights on all the time and some research shows that this may reduce the risk of collisions (see here). All of this advice is summarized in the table below:
| Light conditions | Important functions |
Rear lights | Front lights | ||||
|---|---|---|---|---|---|---|---|
| 1 | 2 | 3 | Flashing | Solid | Flashing | Solid | |
| Daytime, good visibility | X | Optional | Optional | Optional | Optional | ||
| Daytime, poor visibility (fog/rain) | X | Essential | Optional | Essential | Optional | ||
| Dawn and Dusk | X | Essential | Optional | Essential | Optional | ||
| Night-time*, urban (with street lights) | X | X | Essential | Optional | Essential | Essential | |
| Night-time*, rural (no street lights) | X | X | X | Essential | Essential | Optional | Essential |
Notes: Function 1 = Illuminate the road ahead; Function 2 = Attract attention; Function 3 = Communicate position and speed.
* = Also applies to tunnels
Choosing Between Bike Lights
Positioning of Lights
When choosing a bike light, an important but often overlooked criterion is the variety of mounting options and the quality of the mounts. Lights should not be obstructed by bags or other parts of the bike and the horizontal and vertical angle should be set to provide maximum visibility. Satisfying all of these requirements can be a problem for many bikepackers who use large seatpost-mounted bags that block the entire seatpost area (see the Bikepacking Bags page). The light mounting position should never be compromised for the sake of using a certain bag mounted in a certain place, the light and safety should always come first.
If the seatpost area is not available, rear lights can be attached to the seat-stays, the rider’s helmet, the rear bag, or a rear rack. It can be difficult to control the position and angle of a light when mounted to a flexible or movable surface like a bag or helmet, so I would only use those positions to mount secondary lights, never my primary rear light. Using a rear rack with a rack-top bag or side pannier bags can yield a safety advantage because many rear lights have mounts available that attach to the standard mounting holes that are on the back of many racks, which places the light in an ideal position for visibility.
Finding a good mounting position for front lights can also be a problem when using aerobars, accessories and bags. Front lights that are used to illuminate the road ahead that have a focused beam are normally designed to be mounted at between 70 and 100 cm above the ground. Mounting them much lower, on the fork legs, can cause the beam pattern and the degree of illumination in each part of the beam to be less than ideal.
As mentioned above, there is a Headlights page in the Bike Accessories section that describes various dynamo-powered and battery-powered options that satisfy Function 1 very well. Here I give some specific recommendations for taillights that serve Functions 2 and 3 well:
Taillights
Dynamo-Powered
Most front dynamo headlights can be used with any brand and model of taillight. The exceptions are that Supernova headlights can only be used with the E3 taillight and the Exposure Revo headlight can only be used with the Red Eye taillight.
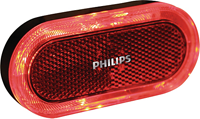
As explained above, Function 3 is best fulfilled by taillights that are reasonably broad, so compact models like the Supernova E3, SON, and Busch & Müller Line Small are not ideal. The best light for that criterion is the rack-mounted version of the Philips Saferide (shown on the right), which also has a version that can be mounted on the seatstays if no rack is used. Busch & Müller also have a large range of decent taillights, including the Secula model that can be mounted to the seatstay.
All dynamo-powered lights that I’m aware of only have a solid mode, no flashing mode. So although dynamo-powered lights can perform Function 3 reasonably well, it’s normally better to supplement them with battery-powered lights that have good flashing modes to satisfy Function 2.
Battery-Powered
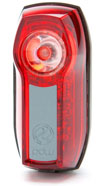
I’ve used the Planet Bike (also branded as Smart) Superflash lights a lot; there is a version that is USB-rechargeable (Amazon) and another that uses replaceable batteries (Amazon). Both have an excellent, bright flashing pattern, and the version that uses replaceable batterties lasts a lot longer than the USB-rechargeable versions, but unfortunately I’ve experienced failures with each in heavy rain. I’ve also used the similar PDW Aether Demon USB (shown on the right), which has survived a lot of poor weather and so I prefer that.
Because there are so many cheap flashing battery-powered lights available, most people are averse to buying anything more expensive, but saving more on safety items is not ideal. My current favorite taillight is the Moon Nebula (Amazon), which is a medium-price model and is shown in the above section about Function 3. It is very bright, has a broad illuminated area, has good battery life, has good flashing modes, seems well sealed against rain, and has a multitude of mounting options.
Number of Lights
Unfortunately, bike lights are not entirely reliable. They have to withstand all types of weather, continual vibrations and occasional knocks, plus batteries have a limited life, which means that a single light can never be relied on 100%. Therefore, in addition to often using two lights in different modes to serve different functions, you should have multiple rear lights illuminated because if one fails while riding, you probably won’t know about it for a while, which could be very dangerous.
I’ve had lights (from a wide variety of brands and price levels) fail so often that on long rides I bring a third light for the front and rear so that I can continue to have two usable lights after one fails. I’m even more conservative when preparing for a bikepacking race and may take up to four lights for the front and four for the rear because I once had two rear lights totally fail and my third light partly fail during a single race. I finished the race while in constant fear that my remaining rear light would go out due to having a faulty connection; it did just make it but I don’t want to relive the experience.
A useful light to bring as a reserve is the Lezyne Zecto Drive Pro (Amazon) because it has two white LEDs for use on the front of the bike and one red LED for use on the rear, and it’s easy to switch between these modes. It has a simple strap-on mount so can be fixed to any tube of the bike when being stored in reserve, is reasonably bright as both a front and rear light, has a good selection of solid and flashing modes, and has a clear 4-level battery status indicator, see the video below:
Wearable Lights
I’ve often used the Noxgear Tracer360 (Amazon) illuminated vest when riding at night. It has excellent visibility and good battery life, see the video below.
As discussed on the next page on Passive Lighting for Cyclists, illuminating moving body parts can be even more effective than illuminating static body parts so it may be wise to use an illuminated ankle bands, but I haven’t personally used any because prefer to use passive lighting in that location (pedal reflectors and/or reflective ankle straps).
Brake Lights & Turn Signals
Brake lights and turn signals (aka indicators) are essential on motor vehicles and are excellent safety tools. It would be logical to generalize this to bicycles, so many companies sell such lights for bicycles, but I find these to be worthless gadgets.
A major reason for vehicles needing brake lights is that when driving behind another vehicle, the vehicle in front blocks the view of the driver behind. So if a hazard appears causing the car in front to stop quickly, often the vehicle behind cannot see the hazard so the brake lights are very useful information to know that the vehicle in front is slowing down rapidly.
Drivers have a mostly clear view of the road ahead when a cyclist is in front of them, so if a hazard or intersection appears that causes the cyclist to brake then the driver behind should also be able to see the same thing and will respond in the same way. The driver’s response to the situation will almost certainly happen before the driver notices that the cyclist’s brake light is illuminated, so the light will have no effect.
As well as braking for hazards and intersections that cars can also see, cyclists may brake before making turns or before pulling off the road to stop. Even in those situations, brake lights are not particularly helpful because before making the turn or pulling off of the road, the cyclist should make a hand signal that they are going to do so (see below), and that signal also acts as a warning that the cyclist will be slowing down. The hand signal is far more effective and obvious than a brake light.
In addition to this lack of need for brake lights on bikes, there is also a lack of understanding from drivers. Almost no drivers will realize that a red rear bike light that illuminates or increases in intensity means that the bike is slowing down because drivers are used to bikes having all sorts of lights on them that only flash to attract attention and not to communicate manoeuvres.
My final point is that despite having extensive experience with cycling in all sorts of situations and having spoken to many others who are similarly experienced, I’ve never experienced or heard about a collision or even a near-miss that was caused by a driver who was following a cyclist specifically not being aware that the cyclist was braking and slowing down. There are a multitude of scenarios that cause vehicle-bike collisions, but this scenario is one that I’ve never heard of being an actual problem. Rear brake lights for bikes are therefore a solution that is looking for a non-existent problem.
Turn signals (or indicators) on bikes are also ineffective. The argument is not as much focused on them being unnecessary, because turn signals could be quite useful on bikes, the problem is that drivers don’t understand them and/or ignore them.
A far more effective way to signal a turn on a bike is to use your arm and hand to point where you’re going, drivers are then far more likely to give you time and space to make the desired manoeuvre than if you turn on an extra flashing light, which they probably won’t understand or they’ll choose to ignore. At night-time, hand signals are not so obvious, which is why you should be wearing something that has white or light-colored sleeves and preferably something reflective on your sleeves or gloves.
Even after signaling a turn, if you need to move across a lane of traffic then it’s necessary to look around and see if the way is clear or if drivers behind are yielding the space. None of this will be achieved any more easily if you have an extra blinking light on your bike, so I cannot see an advantage to having turn signals on bikes.
Summary
Very few people consider the topic of bike lighting in as much detail as this, considering all three functions of bike lights and when different light modes should be used to maximize safety. Car lighting is certainly far simpler to operate. It would be nice if complete bike lighting setups were developed that responded to ambient light conditions and selected the appropriate lighting combination for the user. Hopefully such ultimate light setups would also be more reliable than many current bike lights.
Unfortunately, an automatic, integrated, and reliable lighting solution is unlikely to ever exist for bicycles, so we must be aware of the functions that our lights need to serve. We must then choose our lights and where to mount them to be most effective. When riding, we need to decide in which situation to use which light function and also monitor the charge level of battery-powered models. The task is not straightforward and I hope that the information presented here helps people to make better and safer decisions regarding their bike lighting.
Last significant page update: December, 2017
This page is in the Rider Health & Safety section. The next page in this section is:
