This page contains advice on choosing bike frames (material, geometry, etc.) for long-distance cycling and the pros and cons of rim brakes versus disc brakes on road bikes. Recumbent bikes are also briefly discussed.
Page Contents:
Bike Frame Materials
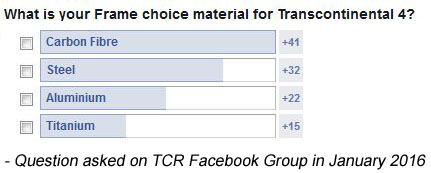
The four main materials used to make bicycle frames: steel, aluminum, titanium, and carbon fiber, are all relatively common choices for bikepackers, as shown by the results of the poll on the right conducted in the Facebook Group for the Transcontinental Race (TCR) in 2016.
Steel is the more traditional and classic option that is the heaviest but tends to be less stiff than the others and so gives a more comfortable ride. Aluminum is much lighter than steel, but is typically stiffer and not as comfortable, although more modern aluminum frames typically offer better comfort than earlier or more basic models. Titanium is a similar weight to aluminum but has a similar level of comfort to steel. Carbon fiber is the lightest material and its characteristics can be more easily varied to be stiff in areas where it needs to be but more flexible and comfortable in other areas. Carbon and titanium frames generally cost significantly more than aluminum and steel frames.
These general properties of frames made from each material are far from being universal laws – there is a large amount of variation between different bikes made with the same material because the exact type, shape, and size of tubing used can vary substantially. In addition, when considering a bike’s comfort, the properties of the frame are only one, relatively minor, factor that determines comfort because there are many other components between your body and the road (e.g., tires, saddle, handlebars, etc).
Here are some very rough guidelines of frame weights for a road frame made for rim brakes with different materials:
| Material & part | Weight (grams) |
| Carbon fiber frame | 700 to 1200 |
| Aluminum frame | 1100 to 1500 |
| Titanium frame | 1100 to 1600 |
| Steel frame | 1300 to 1800 |
| Carbon fork | 300 to 500 |
| Steel fork | 500 to 800 |
Because these ranges overlap, it’s not hard to find an example of, for instance, an aluminum frame that is lighter than a carbon frame. Also, there are certainly examples that fall outside of each of these ranges; these values merely reflect what is typical.
Aerodynamic Bike Frames

Road frames designed with aerodynamic tube shapes are becoming more common. The tube shapes are still limited by the rules of the UCI, and so are not as aerodynamic as they could be, and such shapes can make the frame less comfortable than frames with traditional round tubes. On some frames, further aerodynamic gains have been achieved by integrating components like brakes into the frame and fork, but often at the expense of functionality, ease of maintenance, and reduced compatibility with accessory mounting.
As discussed on the Air Resistance of the Bike page, an aerodynamic road frame may have a CdA that is about 0.01 to 0.02 less than a standard road frame, which translates into up to 0.25 km/h difference in speed for an average-strength rider on the 2016 TCR route. However, these values are based on measuring the frame alone in a wind tunnel – the differences are probably far smaller when bikepacking bags and accessories are added to the frame. I’m therefore doubtful that the disadvantages in practicality and comfort of many such frames are offset by the minimal speed gains.
Anyone looking for a truly aerodynamic frame should consider something that doesn’t adhere to the UCI’s restrictive rules. Some triathlon bikes were released in 2016 that really push the boundaries of what is possible with an upright bike (e.g., the Cervelo P5x and Diamondback Andean) but their geometry and handlebar options may not be ideal for ultracycling. Most Recumbent Bicycles are far better aerodynamics than any ‘upright’ bike due to putting the cyclist into a more optimal position that is often also more comfortable. The fastest recumbent bikes are those with full fairings, known as velomobiles or streamliners. Most bikepacking races only allow people to use upright bikes, so recumbents are not considered further.
Frame Geometry
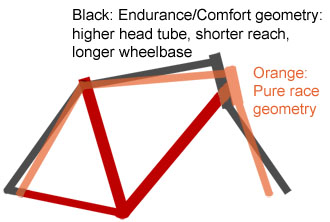
There are two important aspects of frame geometry that differentiate road bikes. The first is how quick the bike is to respond to steering input. At one end of the range are road bikes that are often referred to as endurance/comfort models that have a very relaxed geometry that gives a more stable ride due to having a longer wheelbase and a more comfort-oriented riding position due to having a higher head tube, and often also shorter reach (i.e., distance to the handlebars). At the other end of the scale are pure race bikes that have an aggressive geometry that gives a faster steering response due to having a shorter wheelbase and a lower and longer handlebar position. See the diagram on the right, in which the differences have been exagerated slightly for the purpose of clarity.
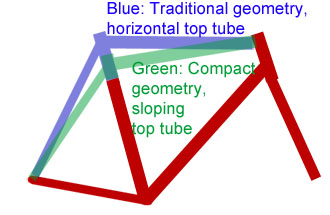
The second main distinguishing factor between different road bike geometries is the angle of the top tube. Some bikes have “compact” geometry in which the top tube slopes downwards from the head tube to the seat tube to make the seatpost clamp much lower, thereby exposing a lot of seatpost to improve comfort while increasing the lateral stiffness of the frame. On bikes with more traditional geometry, the top tube is closer to being horizontal. How much of an effect these factors have on ride feel is debatable.
The geometries of the two bikes that I’ve used to ride the TCR differ greatly, with one having more aggressive geometry (Specialized Tarmac SL4) and one having more relaxed geometry (Ridley Fenix SL). In addition, the Specialized has a very sloping top tube and the Ridley has a more traditional top tube. Despite these measurable differences in geometry, having set the position of the saddle, pedals, and bars to be almost the same on the two bikes, I cannot perceive much difference between them when riding. In fact, I would have a hard time deciding which bike I was riding without looking at it, and I still haven’t decided which I prefer to ride.
Although I don’t know which bike I prefer to ride on local rides, I do have a preference between the bikes when bikepacking because the Ridley has a more horizontal top tube and a slightly higher head tube than the Specialized. I ride a smaller than average frame size (52 cm), so space in the front triangle is often quite limited compared to someone with a larger frame size, so the Ridley is my choice for bikepacking because I can fit a much larger frame Bags and Water Bottles in it (there is 15% more total space inside the front triangle of the Ridley than the Specialized). The other difference between my two bikes is that the Ridley has slightly more clearance for the full Fenders/Mudguards that I like to use. It’s aspects like these on which I based my decision to buy the Ridley – I wasn’t too interested in riding characteristics because most race bikes feel very similar to me (as long as the contact points, their relative positions, and the tire pressures are all the same).
Frame Size
There are various ways to determine what frame size is right for you, most of which are summarized in this Our Bike Guide article. If you want to use a really simplified approach to get a rough estimate of the appropriate frame size for you then tables showing what frame size is appropriate for someone of a given height or leg inseam are available, possibly the most complete being at Bicycle Guider. However, be aware that one brand’s 56 cm frame may be more equivalent to another brand’s 58 cm than to the other brand’s 56 cm. Because the sizes no longer conform to any specific frame dimensions, many brands list their sizes as S, M, L, etc., which are even less comparable between brands. The solution to all of this confusion is to use the stack and reach measurements. Before explaining that in more details, I begin by how to measure your current riding position (ignoring frame size for now).
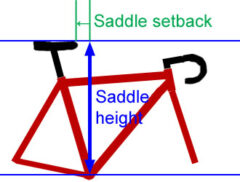
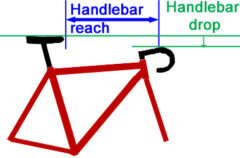
There are four important measurements when looking at your riding position, two concerning how the saddle is positioned relative to the cranks and two concerning how the handlebars relate to the saddle. As discussed on the Riding Position page, saddle height is measured as the distance from the crank axle to the top of the saddle, saddle setback is the horizontal distance that the tip of the saddle is behind the crank axle, handlebar reach is measured as the horizontal distance from the tip of the saddle to the center of the handlebars and handlebar drop is the difference in height between the top of the saddle and the top of the handlebars. Some bike fitters vary slightly in how these things are measured (e.g., which point on the saddle is used, and whether the crank axle or pedal axle is used), but that doesn’t change the outcome.
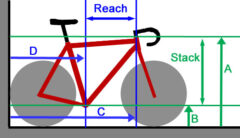
If trying to copy your position on one bike onto another bike, it is these four measurements that you should try to replicate. If trying to choose a frame that will allow you to replicate these measurements easily, then it is the Stack and Reach measurements of the frame that are the best indicators as to how easy this will be. Stack is the vertical distance between the crank axle and the top of the head tube. Reach is the horizontal distance between these two points.
If you want to measure the stack and reach of a frame you currently have, then you should put the back wheel of the bike against a wall, make sure that the bike is not leaning to the side (placing it diagonally across a corner of a room is often easiest), and take four measurements:
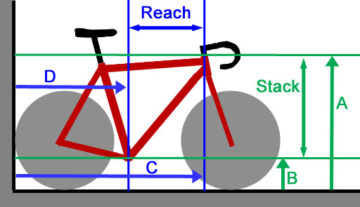
A = Ground to top of head tube
B = Ground to centre of crank axle
C = Wall to centre-top of head tube
D = Wall to centre of crank axle
Then perform two subtractions:
Stack = A – B
Reach = C – D
Frame geometry charts give many other lengths and angles. For instance, people have traditionally focused on seat tube length and top tube length (or ‘virtual’ measures of these for frames with sloping top tubes/compact geometry). However, two bikes with the same measurements on these two values can vary widely in fit if any one of the seat tube angle, head tube angle, or head tube length are different. Instead of mentally trying to combine these measures and angles and making corrections for differences, it is far easier to just look at stack and reach and forget about the impure measures of seat tube and top tube lengths. Other bike geometry measurements (e.g., head tube angle and wheelbase) are important when considering bike handling (which was briefly discussed above), and other measurements can be important when deciding which bags will fit in the frame, but stack and reach are the only important measures when considering bike fit.
Road.cc have a good article explaining how various aspects of a bike’s geometry affect certain characteristics and this topic is also covered in this GCN video:
I cannot tell you what frame size you need, just like I cannot tell you what position is best for you, but the knowledge that I’ve given here will help you to make an informed decision for yourself based on your current frame and what you’re looking for in a new frame. You can visit an experienced bike fitter if you need some advice on your position and frame size. However, as I mentioned on the Riding Position page, many fitters don’t have much experience optimizing comfort for ultracyclists, so take their advice as merely a starting point and then experiment with your position to find what feels right for you.
There are so many stock frames in such a wide array of sizes, geometries, and designed for a wide variety of purposes that most people should be able to find a stock option that meets most of their requirements. The Geometry Geeks website is trying to compile an index of bike frames to make searching for one with your requirements a lot easier. However, some people prefer the experience and result of having a frame custom built for them. Custom frames are not only customizable in terms of geometry, comfort, ride feel, and paint color, but also in terms of what accessory mounts they have. Most custom builders work only in steel or titanium, but there are a few who do custom carbon frames.
Disc versus Rim Brakes
Both disc brakes and rim brakes have advantages and disadvantages. The two systems use different mounting points on the frame and different wheel hubs, so the choice of brake type needs to be made when choosing a frame.
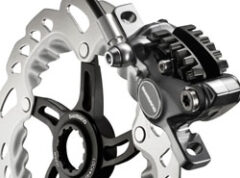
The advantages of disc brakes over rim brakes include slightly better modulation of braking force, slightly more maximum braking power, less hand pressure required for a given level of braking, they are less affected by wet or dirty riding conditions, and they keep working well even if the rim is out of true. Frames designed for disc brakes also normally have more clearance for wider tires and/or fenders than on bikes with standard race-bike rim brakes.
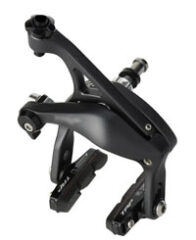
The advantages of rim brakes over disc brakes include lighter weight (a total of about 400-800 grams difference between otherwise equivalent bikes), the brakes are much easier to adjust and maintain, including being easier to keep running quietly and easier to change the brake pads, and forks built for rim brakes normally offer more comfort (because disc brake forks need extra reinforcement to withstand the braking forces).
I own road bikes with both types of brakes, but prefer rim brakes because of the easier maintenance – the extra hassle in keeping the disc brakes adjusted well and running quietly just isn’t worth the very marginal gains in braking performance for me (I’m a professional bike mechanic, so the maintenance isn’t a problem, only an annoyance). I’m an experienced and confident descender and even on the most extreme descents that I’ve done using a rim-brake road bike, including the 47 switchbacks of the Stelvio Pass in pouring rain during the 2014 TCR, as well as many other passes in snowy, wintry conditions (I live in Switzerland), rim brake performance has never been a major cause of worry for me. There are occasionally situations where having disc brakes would be preferable, but those are not common enough for me to want disc brakes on my race bike.
For someone who is less confident when descending, disc brakes could offer more of an advantage. In extreme situations, particularly for heavier riders or on tandem bikes, it is possible to overheat rims when using rim brakes continuously on long descents, which can cause inner tube failures, so again disc brakes could offer an advantage for those people (see the tips about braking technique on the Riding Technique & Efficiency page). In addition, people who suffer from hand problems when riding long distances (see the Hand Comfort: Handlebars, Aerobars & Gloves page) may prefer hydraulic disc brakes because pulling a hydraulic brake lever requires far less strength for the same amount of braking force than does pulling a mechanical lever. Another situation is someone who wants to fit wider tires or have more space for fenders than rim brakes will allow; again disc brakes provide a good solution to this problem.
The differences in braking performance between the main brands (Shimano, SRAM, and Campagnolo) are quite small. Shimano rim brakes are widely regarded as setting the benchmark for stiffness and performance, and work best when paired with Shimano levers (which have a slightly different brake cable pull ratio). Campagnolo and SRAM rim brakes are both not far behind Shimano and give decent performance (as long as the dual-pivot version of the rear brake is chosen for Campagnolo). Some people prefer to replace Campagnolo’s special brake pad holders with a standard option from another brand to make changing pads as easy as it is with Shimano and SRAM brakes.
If you prefer to use hydraulic disc brakes then braking performance is excellent with both Shimano and SRAM brakes, but Shimano’s hydraulic system can be slightly easier to maintain (i.e., to change pads and to bleed the system to remove air bubbles, see this video). A BikeRadar article reported that the pads in SRAM disc brakes wear much faster in muddy conditions than Shimano’s. Campagnolo were much slower to release a hydraulic disc brake setup, finally doing so in 2017 several years after Shimano and SRAM.
Shimano, Avid (part of SRAM), and TRP (part of Tektro) all make decent cable-actuated disc brakes. I’ve used all three on my own bikes, and found the TRP Spyre, which is the only one that moves both pads towards the rotor, always gave a very soft feel in the lever regardless of how it was setup (pad position, angle, type of cable housing, etc.). I’ve been much happier with the performance of the Avid BB7 and Shimano CX77 cable-actuated disc brakes; with the Shimano model having an advantage due to it being lower profile and so not interfering with fender and rack stays as much.
Recumbent Bikes
Bicycles with a recumbent riding position were developed alongside more standard-looking bikes in the 1800s (see the History of Bikepacking Races page), but none were really raced until the 1930s (source). The speed advantage of recumbent bikes due to their improved aerodynamics was immediately apparent, which is part of the reason why they were soon banned from regular races.
The popularity and design of recumbent bicycles started to improve in the 1970s and since then many specific races have been organized. Recumbent bikes have also been used to set several ultra-distance records, including the furthest distance ridden in one hour, 24 hours, and record times for routes like Lands End to John O’Groats in the UK. They’ve also been allowed to enter some ultracycling races with upright bikes and have won some divisions of RAAM (source).
Recumbent bikes are certainly faster and more efficient than upright bikes. However, for reasons such as increased cost and lack of prominent competitions, very few people are interested in riding them, including most people who like to ride ultra-distances.
In certain races such as The Transcontinental Race, recumbent bikes are explicitly banned. In other races such as the Trans Am Bike Race, they are allowed and have occasionally been used but never by anyone competing for the victory. I expect that they would offer a major efficiency advantage in those races and probably also a comfort advantage. I would therefore be interested to see someone really push the boundaries using such a machine.
Last significant page update: December, 2017
This page is in the Bike & Bike Components section. The next page in this section is: