As explained in my previous blog post, I’m doing the Swiss Ultracycling CHallenge or SUCH bikepacking race next week. It’s been a few years since I fully described my bike setup and equipment list and people keep asking about it, so here are the full details.
Regular readers of this site will know that I’m very picky about every component of my bike and item of equipment that I take on an ultra-distance bike race. I’m not a weight weenie, I prefer practicality and to be adequately prepared for most situations because I know that equipment and bike weight doesn’t slow down riding speed as much as most people think and it’s more important to focus on minimizing stationary time and avoiding delays.
The SUCH race will be by far my shortest ultra-distance race yet (about 900 km compared to the 2,000-4,000 km I’ve done in previous events) and I’m familiar with most of the route, meaning that I’m confident about where to find everything I’ll need along the way. Even so, my setup and packing list wouldn’t change much if I was doing a much longer race in less familiar regions except that I won’t be taking a sleeping system this time (minimal bivvy bag, small inflatable mattress and lightweight sleeping bag).
Bike
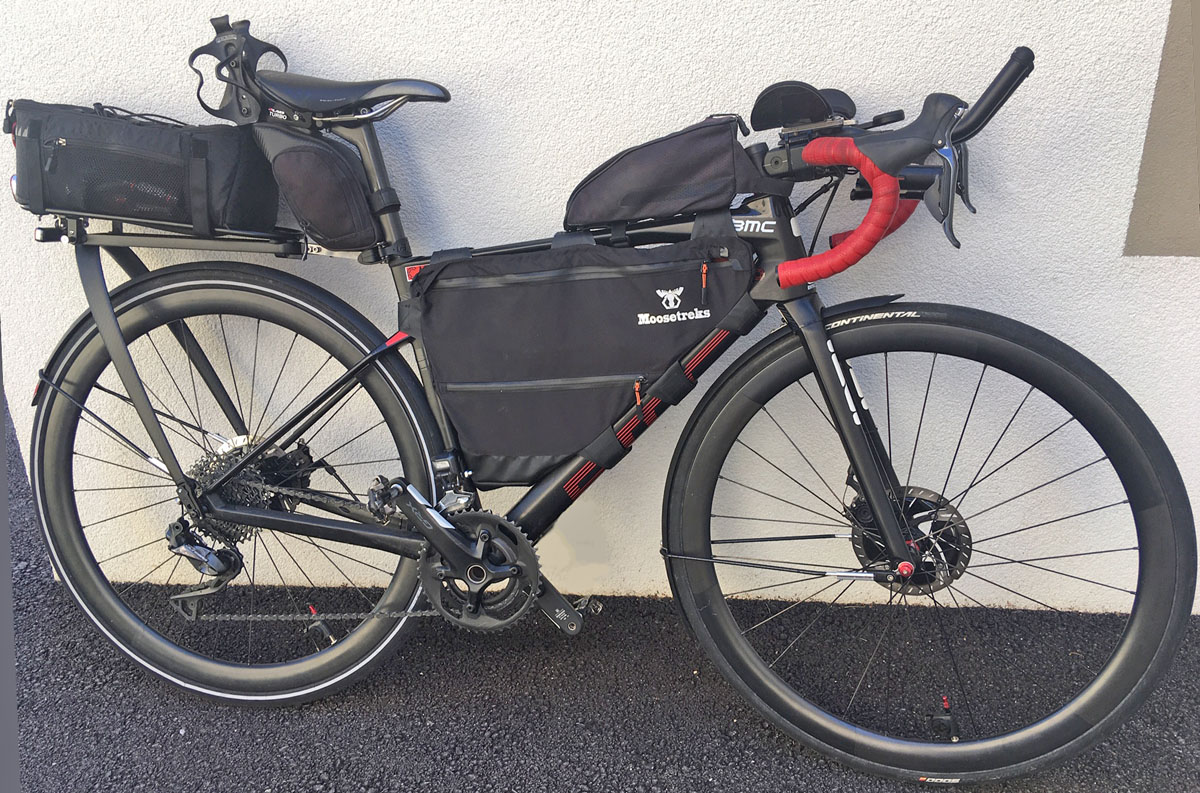
I’m riding my 2020 BMC RoadMachine. It’s a carbon, disc brake road bike designed for endurance/comfort road cycling but still with a reasonably aggressive geometry.
The BMC is much lighter than the carbon gravel or aluminum touring bikes that I have (each different generations of the Specialized Diverge) and still has just enough space for decent-width road tires and full fenders. It doesn’t have mounts for fenders or a rear rack, but I’ve found ways to fit those securely.
Components
- Gear shifting: Shimano Ultegra Di2 derailleurs and shifters – with extra shift buttons on the bar tops and aerobar extensions for ultimate shifting comfort and performance.
- Gear ratios: Shimano GRX 46-30 crank with a custom 12-36 11-speed cassette (a Shimano 12-25 cassette combined with a SRAM 11-36) – I like to spin when climbing and on the descents I normally conserve energy.
- Brakes: Paul Klamper mechanical disc brakes – these brakes are expensive but they’re by far the best mechanical discs out there: they perform almost as well as hydraulics and are super-easy to adjust. Metallic pads with Shimano Dura Ace rotors. I find rim brakes give sufficient braking performance but they don’t allow enough space for my preferred setup of moderate-width tires and full fenders.
- Stem: RedShift ShockStop Stem – the extra comfort that this suspension stem gives is fantastic; I would also be using the ShockStop Seatpost but I need to get a custom shim manufactured for it to fit in this frame, so I’m stuck with the stock BMC seatpost for now.
- Wheels: Handbuilt by me using B-Dop Cycling carbon rims, 50mm deep & 25mm wide, 28 x DT Swiss Aerolite spokes per wheel and DT Swiss 240S straight-pull hubs.
- Tires: Continental GP 5000 – with tubes to keep life simple. The official tire widths are 25 front and 28 mm rear, but they measure 26 and 30 mm on these rims. Swiss roads are generally excellent quality and with the ShockStop stem I’ll be comfortable and efficient.
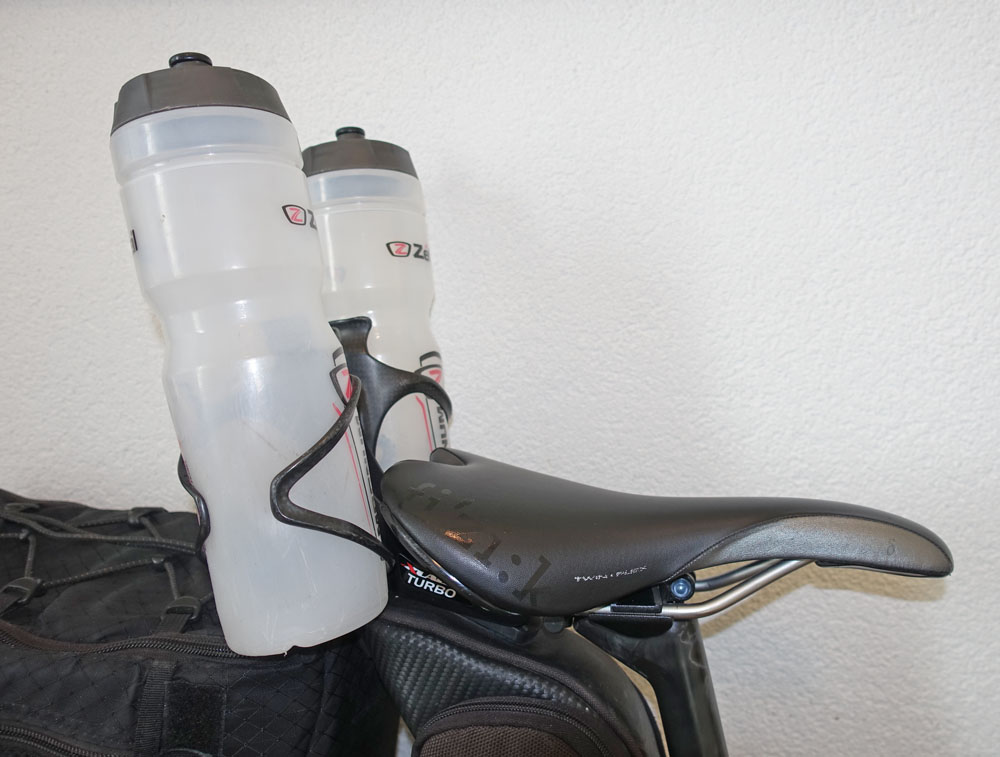
- Saddle: Fizik Aliante Gamma saddle – the classic version of the Aliante, not the newer version that has far less padding.
- Handlebars: Lizard Skins 2.5mm bar tape on BMC compact-bend bars. 3T Clip-on flip-up aerobars (they rest on the bar tops when down, or flip up to give full access to the regular bars).
- Pedals: The short-axle version of Shimano’s SPD pedals, model PD-M9100S, to compensate for the wider GRX crankarm spacing.
Accessories
- Rear rack & bag: Tailfin carbon rack with a Mountain Equipment Co-op rack-top bag. I recently reviewed the Tailfin AeroPack bag and rack system. I don’t like the roll-top closure, lack of pockets and mounting position of the AeroPack, so I’ve found another rack-top bag that the Tailfin mounting system can attach to and I extended the rack’s seatpost bracket to get the bag in a better position. The bag is easy to access with a full, wrap-around zipper and side pockets, and I have a rain-cover for heavy downpours.
- Frame bag: Moosetreks Road full frame bag – there’s not enough room in my 51cm frame for an upper frame bag and bottles, so a full frame bag with the bottles behind the saddle is the most space-efficient method. I found this bag on Amazon that’s a perfect fit and so avoided paying extra for something custom. Everyone thinks that full frame bags affect bike handling when it’s windy, but the side surface area is no bigger than a rear pannier and it’s not connected to the steering, so it’s no problem even in strong crosswinds.
- Top-tube bag: Topeak Fuel Tank – nice and large and I’ve secured it firmly with one bolt and two straps.
- Saddle bag: Topeak MondoPack – perfect size for my extended tool kit and spare parts (full list below).
- Backpack: Minimalist drawstring gym-style backpack to temporarily carry extra food in, but stays packed away most of the time.
- Bottles & cages: XLab Turbo Wing dual bottle cage mount behind the saddle – this is very rigid and puts the bottles in a reasonably easy-to-access position. The Arundel Mandible cages provide the necessary firm grip on the bottles so they bottles don’t eject on bumpy terrain. Two Zéfal Magnum 1 liter water bottles.
- Fenders: PDW Full Metal Fenders – sleek-looking, totally rigid and provide excellent coverage; it required some ingenuity to mount them to this frame and fork, but I eventually found good solutions. Fenders make riding in the rain so much more comfortable and keep everything (including my legs) much cleaner even when on dry roads.
Lights
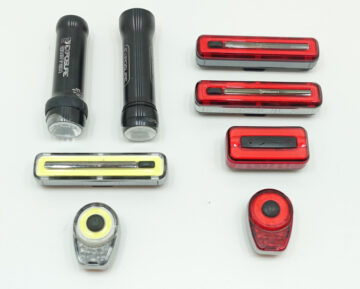
- Front lights: This is my first race without dynamo-powered lighting, so I have multiple lights and backups. My main headlights is an Exposure Sirius plus a reserve Exposure Switch and battery packs (see below). On twisty descents, I clip the reserve light onto my helmet mount to point it around corners, but the Sirius mounted under the bars is more than sufficient most of the time. For flashing front lights in low light and at dusk/dawn, I have a Moon Sports Ring and Nebula.
- Rear lights: Two mounts wiith four lights so I won’t run out of power. All the lights are Moon Sports models because they have an excellent range of mounts and the battery life and flashing modes are excellent. Two Nebulas, one Ring and one Arcturus.
Electronics
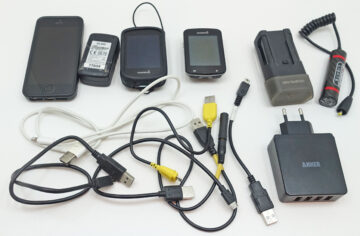
- Navigation: I know most of the route pretty well, so I’m leaving my big Garmin Edge 1030 at home and instead I’m taking my wife’s Edge 830 with an old 820 as a smaller reserve. I’ve programmed some custom data fields using AppBuilder 5 to keep track of the percentage of time spent moving versus stopped and the average overall speed including stops as well as when moving (the custom data fields will be the topic of another post).
- Satellite tracker: A race-issued model by Legends Tracking that transmits position over the cell phone network. Link to the race tracking page.
- Chargers & batteries: Anker high-output 4-port wall charger. Cables for lights, phone, GPS and battery pack. Exposure Lights Support Cell, 3.1 Ah version and Topeak PowerPack, 6 Ah version.
- Phone: iPhone SE 2016 – the most recent non-oversized iPhone (same size as iPhone 5 / 5S). I can attach it to a QuadLock mount on the stem if I need to check something while riding, but it normally stays in airplane mode in my top tube bag.
Clothing, etc.
- Shorts: Standard Craft bib-shorts. I find most chamois pads work fine for me as long as they’re not too bulky and I use a good saddle. Since I plan to use hotels each night, I’ll be able to hand-wash them, so I won’t need to take a spare pair.
- Jersey & undershirt: Castelli mid-weight jersey and Odlo lightweight undershirt. I normally prefer to wear a one-piece outfit, where the jersey and shorts are one piece because I find it cooler and more comfortable than having bib straps. However, all of my one-piece suits are almost worn out or the colors are too dark for night riding, so I’m currently looking for good replacements.
- Gloves: Specialized BG Gel, which have excellent padding.
- Shoes & socks: Giro Terraduro shoes with Specialized BG insoles and Louis Garneau socks.
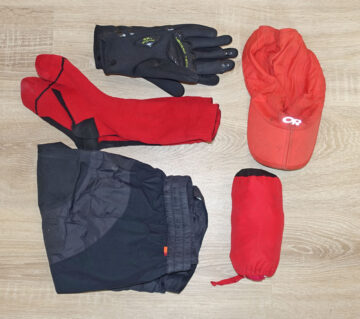
Rain clothing - Rain clothing: Vaude Spray waterproof cycling jacket and Vaude Drop overshorts. Sealskinz waterproof socks and Polaris Loki neoprene gloves. Outdoor Research foldable baseball cap (to keep rain out of my eyes). As mentioned above, full-coverage fenders are an important part of my rain protection so I can keep riding in almost any conditions.
- Cool-weather clothing: Castelli Nanoflex arm warmers and knee warmers. Lightweight Castelli vest and a neck buff.
- Glasses: Tifosi Seek glasses with light photochromatic lenses so they are still usable in low light.
- Helmet: Kask Valegro – I find this helmet to be comfortable and it’s extremely well ventilated. The neck buff is long enough to also be a helmet liner in cool conditions.
- Off-bike clothing: Lightweight trousers, underwear, socks and t-shirt. The trousers are good for pre- and post-race use, I use the t-shirt and underwear to sleep in.
- Utensils: Plastic double-ended spoon/fork and a tiny knife on the Leatherman Squirt multi-tool.
- Toiletries: Miniature sunblock, deodorant, toothpaste and toothbrush, emergency toilet paper. Mini tub of chamois cream – I don’t use it regularly, but there’s occasionally a need.
- First aid: A few plasters, a small bandage and 2 pain-killer tablets – I wouldn’t know what to do with anything in a more complete kit.
Tools & Spares
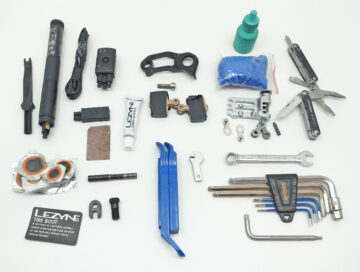
- Tools: IceToolz mini allen key set, 2 to 6mm sizes plus a 6-8mm adapter (for pedals and crank), double-ended Torx 25/10 tool and mini open-ended 8mm wrench. I prefer individual tools compared to a multi-tool because they’re easier to use in tight places.
- Multi-tool: Leatherman Squirt – I take this because I occasionally need a pair of minimal pliers, plus the tool has 2 flat-blade screwdrivers, tiny scissors and a knife.
- Tubes & valve parts: 3 inner tubes, valve extender (in case I can’t find replacement tubes with long enough valves), presta-shrader valve adapter (in case my pump breaks and I need to use a gas station pump), valve core tightener.
- Tube & tire repair: 2 x Park Tool tire levers, 6 tube patches, sandpaper and vulcanizing glue (I don’t trust pre-glued patches because I’ve had too many fail, especially in hot weather), and tire boot.
- Pump: Topeak Morph – this has a flip-out foot and short hose, making it much easier to get a sufficient amount of pressure in the tires. I’m using the SKS AirSpy tire pressure gauges so I don’t need to guess about my tire pressure or if I have a slow leak because the current pressure is shown in an app on my phone (AirSpy review coming soon).
- Chain repair: chain oil in mini bottle (eye drop bottles work well), mini chain tool, quick link, spare pair of chain links and chain pin, and thin rubber gloves.
- Wheel repair: 2 rear-wheel and 1 front-wheel spokes (taped under seat-stay), spoke nipple tool (part of the chain tool) and bladed spoke holder.
- Di2 repair: Di2 cable tool, 1 meter long Di2 wire, ‘A’ and ‘B’ junction boxes, Di2 battery. This should allow me to fix most Di2 issues. If the race was longer, I’d also take a stripped-down Di2 charger.
- Other spares: 2 pairs of brake pads, derailleur hanger, M5 x 15 mm screw, electrical tape (wrapped around pump), 6 zip ties (inside handlebar)
- Security: BBB mini lock.
Chris, always very interesting to see how you are setting up your bikes for these events!
A couple of intriguing insights and some surprises for me as you have gone for a couple of things that I had considered and ruled out.
Firstly very interesting to see that you have got a different bag to work with the Tailfin rack. It looks like you had to do a bit of metalwork to make them match.
But I’m surprised that you have gone with GRX chainset given that they don’t do it with shorter cranks than 170 (unless I’ve missed it). Also, while I liked the look of the BMC bike, the seatpost put me off as, with my current setup, I need more setback than it allows.
Hi Frank. It’s good to hear your feedback and you raise some interesting points.
I was very lucky that I had a rack-top bag in my cupboard that was the perfect shape for the Tailfin rack. I did very little modification to bolt it onto the frame that I took from the regular Tailfin bag (unfortunately, the bag I used is no longer sold). Extending the seatpost support for the rack was a bit tricky, but in my drawer I found a pair of universal fittings that had the holes the perfect distance apart, so I just had to cut those down and bend them a bit (available from SJS Cycles).
You are correct, the lighter, hollow version of the Shimano GRX crank, the FC-RX810 with 48-31 chainrings, isn’t offered in my preferred 165mm length. Fortunately, the lower-end version, the FC-RX600 with 46-30 chainrings, is offered in 165mm. For the left crank, I was actually using a 4iiii power meter Ultegra crank arm to do some post-ride analysis and make sure I didn’t get carried away during the first 100 km in the mountains; I compensated for the difference in Q-factor of the two mismatched crank-arms by using a short-axle SPD XTR pedal on the wider-stance GRX right crank and a standard pedal on the narrower-stance Ultegra/4i left crank – so a real mix of parts from 2 of my bikes that I only used together this one time.
I agree, the seatpost on the BMC RoadMachine is the one thing that I don’t like about this bike (initially there were a few other things, but I’ve since found solutions for the others). The setback is fine for my normal riding position, but I’d like to use my RedShift seatposts on this bike, either the dual-position or the ShockStop suspension post. This winter, I hope to work on a solution for that because the proprietary seatpost is actually based on a round 27.2mm seatpost, the front half matches perfectly but the rear half is extended to make it almost square at the rear. I’m hoping to get a custom aluminum shim manufactured that will allow me to use a standard 27.2mm post in the frame. The internal post clamp pushes against the round front half of the post, so it should hold OK, but it might not be a good idea to not have the rear half match the frame shape perfectly, so I’m still deciding whether it’s possible and worth trying. I’ll clamp an extra collar around the post above the frame to stop it sliding down, but the post and shim could crack the frame if the shape doesn’t match the original post well enough, so it’s risky. I got the bike for an extremely good price because I was working for a BMC dealer until the end of last year, which is why I bought it knowing that there were one or two limitations.
Interesting re the FC-RX600. I had not got the full story, so thanks for that – that’s the ring / crank length I’d want, so that will go on my shopping list!
would absolutely love to know the Garmin appBuilder formula’s you used to keep track of the percentage of time spent moving versus stopped and the average overall speed including stops as well as when moving.
Having this information will really help me plan the perfect ride.
Tailfin aero pack, – Chris your right about the Tailfin, it’s excellent, overall. yet I too will fashion a bracket to move it back away enough from the seat to make access simpler. I shall be keeping the bag though as is.
Dear Chris,
I am very pleased with all the tips you provide. I am actually not participating in a race event (maybe in the future) but just thinking of making international bike trips on my own. I would like to keep my family informed about my position. You refer to a gps tracking system used by an event service provider but do you know good gps systems for bikers like me? I would appreciate your answer. Ps,I also have a BMC Roadmachine RM02. Bart Van Mol from Belgium
Hi Bart. Many events use tracking devices made by Spot, see their website, which upload your position via a satellite connection. For many events, tracker rental is often part of the registration fee. Spot trackers are not too expensive to buy yourself (and can often be bought 2nd-hand), but the subscription is a bit expensive, with a lot of the cost related to covering SOS recovery. Garmin now offers a line of inReach devices that offer something similar. You can also set up tracking with a standard smart phone, but coverage isn’t as good as the satellite-based devices, it drains the phone battery really fast, and isn’t a good option in some countries depending on your data plan and network coverage.
The SUCH race was actually a bit different because it stayed within the same country so a special device and service was used that worked through the cell phone network that was cheaper and sufficient for this event, but not useful in your case.
Thanks Chris, appreciate your prompt reply.
Would love to know the Garmin appBuilder formauls you used to keep track of the percentage of time spent moving versus stopped and the average overall speed including stops as well as when moving.
These would really help me plan the perfect ride.
I’m working on a post about this. Before my method was so unstable that it wasn’t worth posting it. My latest version has been working flawlessly for several months, so I’m happy to share it now.
Thanks Chris! really looking forward to the post. I’m planning a 900km ride Toronto Ottawa Montreal and Quebec City in a few months and it will really be usefull.
I’ve finally finished the post that describes how to do this in full detail: How to add custom data fields to a Garmin device using AppBuilder
Great set up. Would love to see how you mounted the Exposure front light. I have profile design aero bars and will have a handlebar bag to store sleeping kit and am thinking of the best way to mount an Estrada Strava RS handlebar light.
Also what do you find is the best way to pause the Garmin for multiday events when sleeping? I have a five day event coming up so when I sleep would like to pause the Garmin and be able to restart it and navigate to continue route. Is it best to pause and put it into sleep mode. I don’t want it to reset and record a new ride as will lose all data like time elapsed etc.
Exposure sell a stem-plate mount for their Strada lights, which might help, but in general trying to mount aerobars, a bar bag and a bar-mounted front light is difficult. Mounting the light on the fork crown, like many dynamo lights are designed to do, is a good solution, but modern carbon disc-brake forks rarely have the necessary mounting hole (it was much easier with rim-brake forks).
Regarding pausing the Garmin overnight, I would definitely stop the ride, save the ride, turn the device off and start a new ride the next day. That minimizes the risk of the Garmin losing an entire multi-day data file without saving anything. If you eventually want to have one data file with the entire ride afterwards then you can combine the separate ‘fit’ files using the FitFileTools website. With separate ride files, in Strava the ride start time and elapsed time is clearly shown, which will allow you to calculate the time of day when you started and stopped each day and you can manually figure out all the stats you want from that.
Interesting read as always – thanks for sharing your extesive knowledge.
One aspect re fenders/mudguards – I see that your front fender does not extend very far forward. I have read elsewhere suggestion there will be reduced wind resistance IF the front fender extends beyond the top of the tyre {source: https://www.renehersecycles.com/myth-3-fenders-slow-you-down/}
~ Do you think this has any validity?
I agree, shielding the top of the front tire from the wind using a fender probably does give an aerodynamic advantage. There is very little data on the subject, but what is available supports this and the theory is valid because the upper part of the tires and wheels are the parts that are moving through the air faster than anything else on the bike. A company called NullWinds developed the AeroDefender for this purpose that I’ve often thought of testing myself, but they initially weren’t available, then very expensive, and now don’t seem to be sold anymore. A modified/extender standard fender would be the next-best solution.