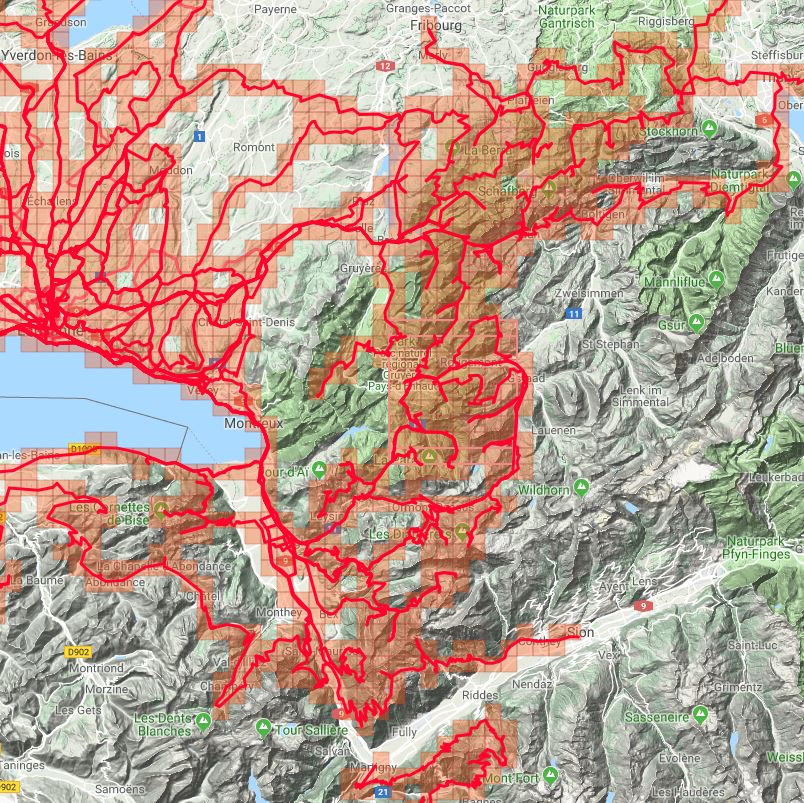
I explored some incredibly beautiful Swiss Alpine valleys this summer and autumn on the bike and by foot due to having the goal of visiting all of the VeloViewer Explorer tiles in my local cantons of Vaud and Fribourg.
New goal needed
For the first half of 2018, my main motivation for Riding Far was to prepare for the TransAtlantic Way Race in Ireland. I was extremely pleased with my 12th place finish, the beautiful route, the unexpectedly mild weather, and a fantastic experience with great people; I do plan to write a ride report eventually. I found it odd to have a primary goal that was completed so early in the season, mid-June, so I needed something else.
Back home in Switzerland, the higher roads in the Alps had taken longer than normal to be snow-free after a reasonably snowy winter, so I was keen to get up high and tick off some more of the VeloViewer Explorer map tiles that I hadn’t yet visited. I explained this concept in this post last year; briefly, the VeloViewer site performs many additional analyses on your Strava data, which includes dividing the map into tiles that measure approximately 1.7 x 1.7 km and counting how many you’ve ridden through. There’s even a Strava group devoted to people like me who try to Ride Every Tile.
I’d slowly been ticking off all of the local tiles and was trying to complete certain regions when I realized that I’d finished all of the tiles in the two nearby Swiss cantons of Geneva and Neuchatel without visiting everywhere in my home canton of Vaud (a Swiss canton is similar to a British county). Vaud is the 4th largest canton in the country, covering 5,224 km2 and so contains around 2,000 VeloViewer Explorer map tiles, of which I’d visited all but about 100. Unsurprisingly, the remaining tiles were all in the more challenging Alpine part of the canton.
My new goal for the season therefore became to explore every corner of the Vaudoise Alps, as much of it as possible by bike, but I had to do some hiking to reach some of the more remote tiles.
Serious climbing
A typical “Explorer ride” often involved taking an early morning train to get closer to my starting location then heading into the mountains for about 80-100 km of tough riding during which I’d climb 3-4,000 metres on a variety of paved roads, dirt roads, farm tracks and hiking trails, on which I’d occasionally have to walk. It was slow progress and I was often happy if my average speed stayed above 16 km/h during those sections. By late afternoon I’d be completely exhausted and would then ride the most direct way home, often up to 70 km away.
Here’s an example, which you can also view on Strava.
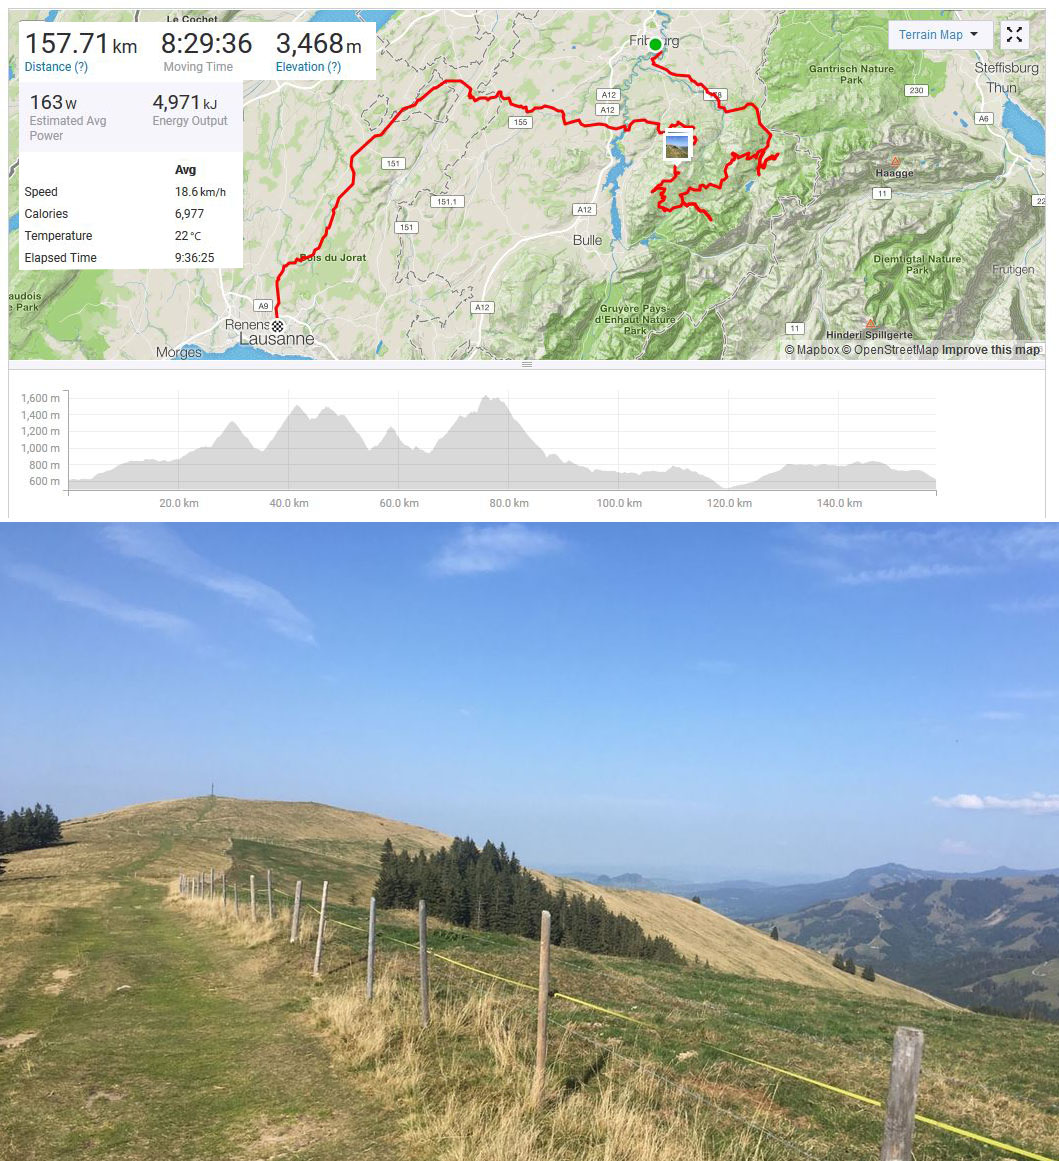
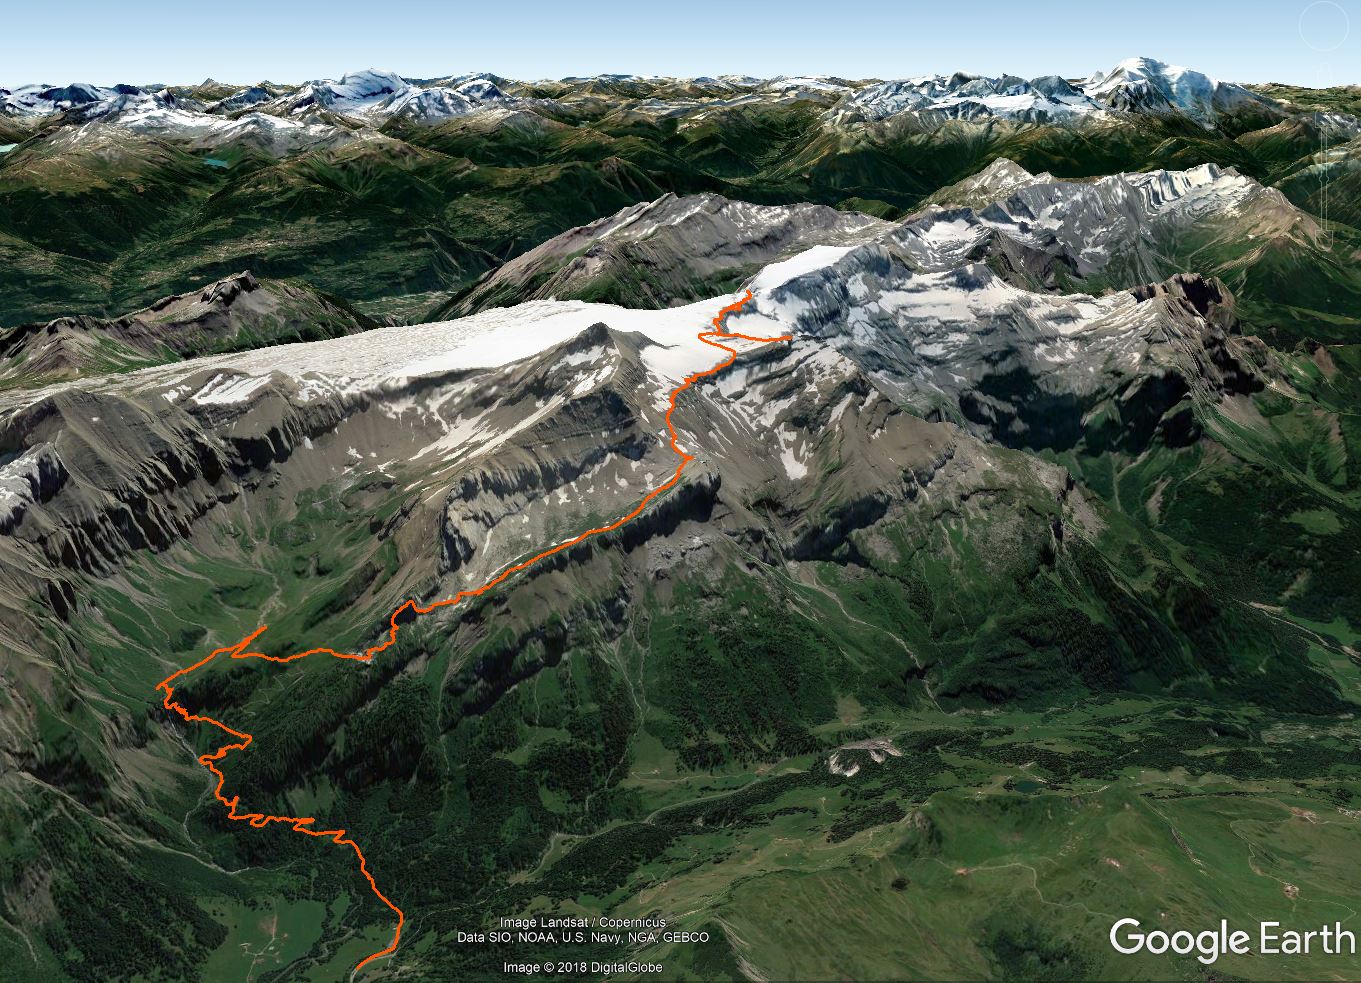
My biggest single climb on the bike started on the bank of the Rhone river at 400 meters elevation, passed through the village of Morcles and continued up a gravel road until reaching the ruins of the Rionda military base at 2,150 meters. I had climbed 1,750 meters in just 14 km for an average gradient of over 12%! It’s even listed as one of the Top 10 hardest cycling climbs in the world.
You can view my complete ride on Strava, but the important part is shown in the Google Earth image below:
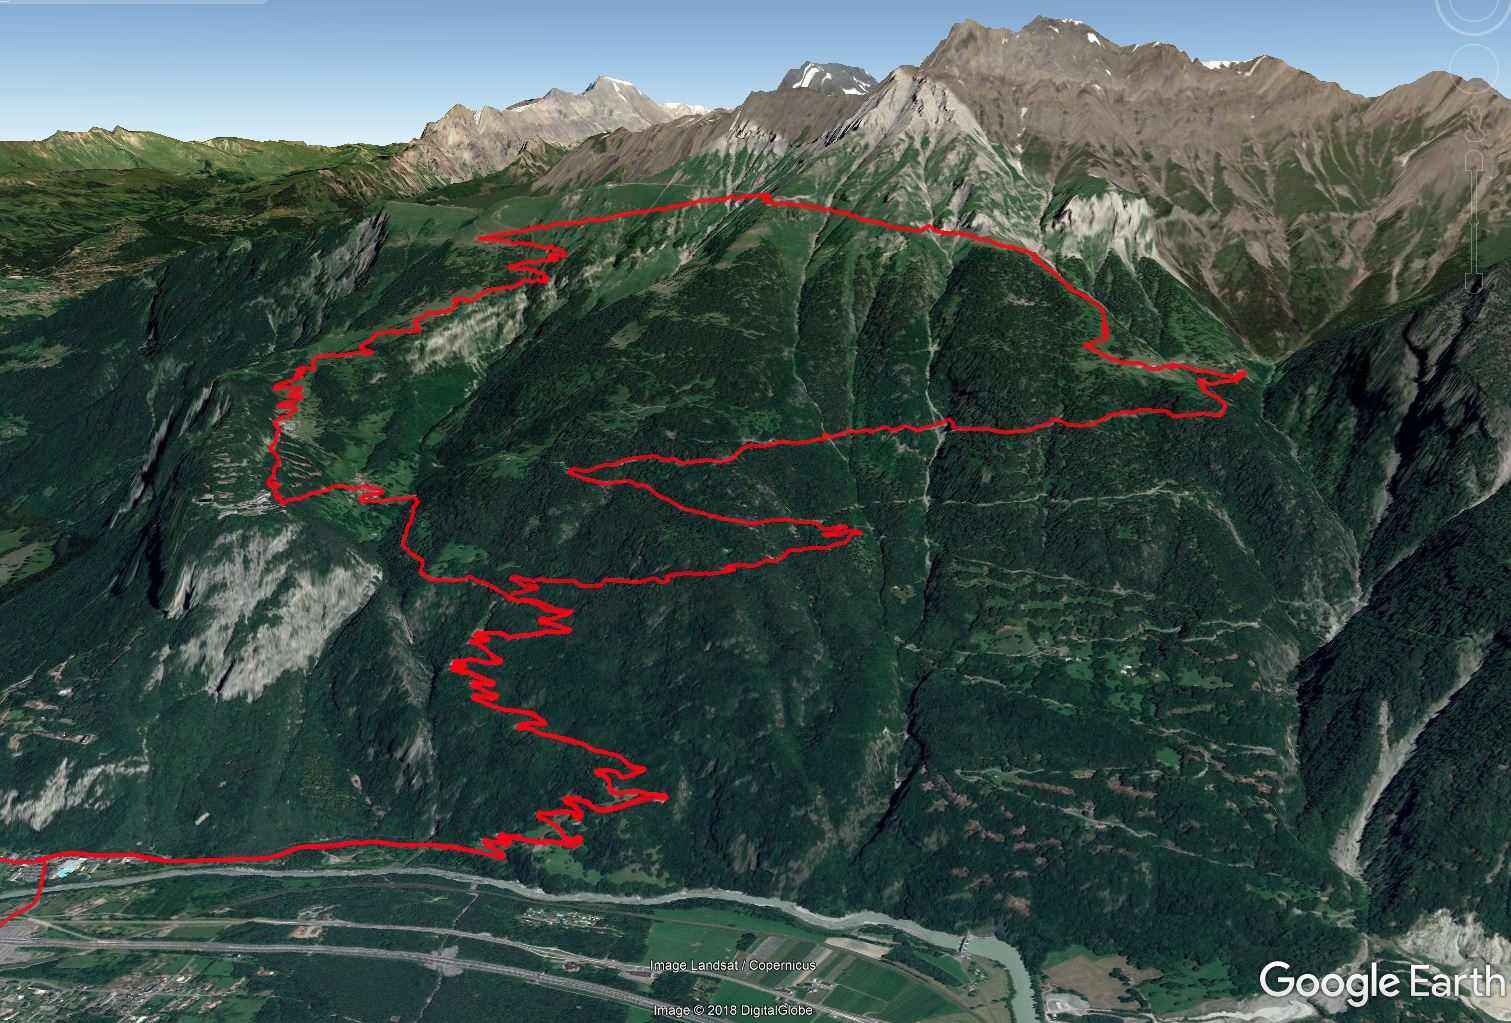
I did the Rionda ride at the end of the season in mid-October when I was at my fittest and it was a perfect way to get my final tiles in Vaud. Just 10 days afterwards, the first snow of the season fell so I had timed it just right, otherwise I might need to wait another 8 months before the higher sections are snow-free again.
Hiking High as well as Riding Far
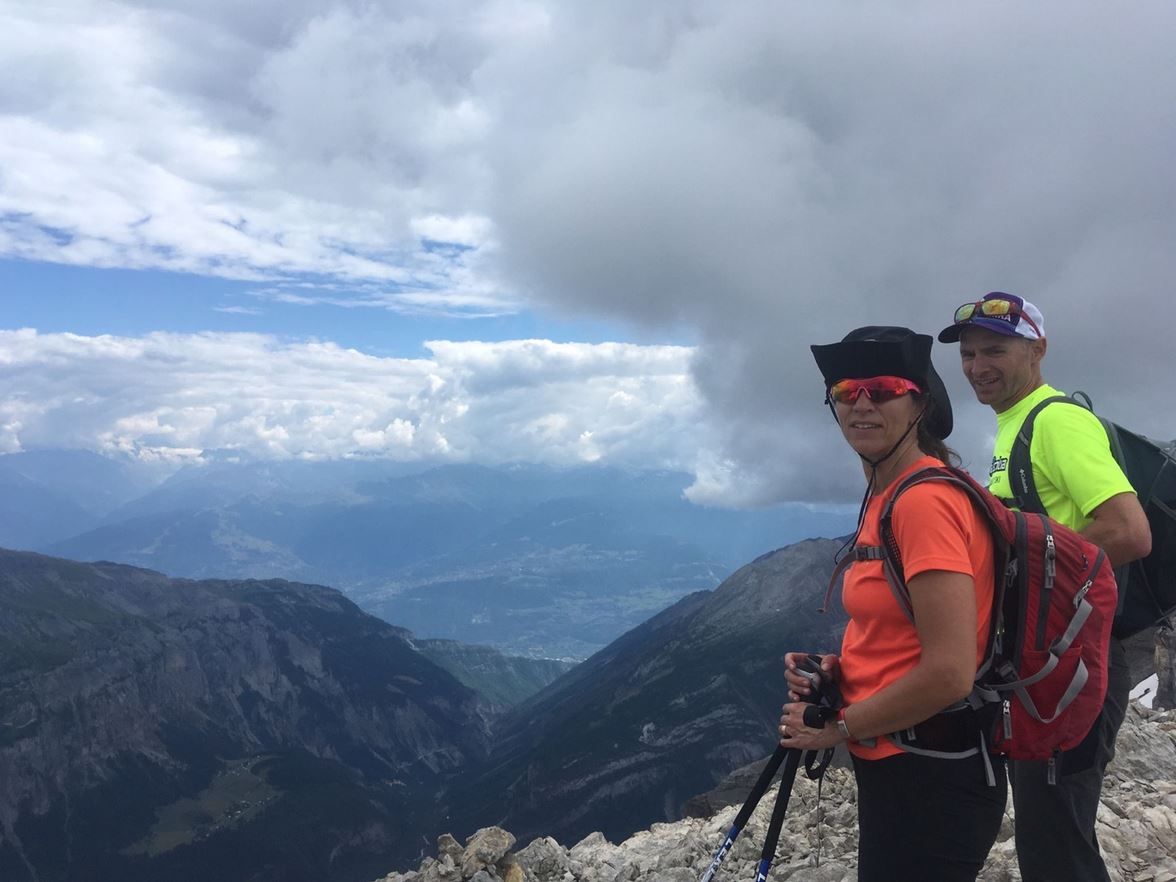
The Les Diablerets massif contains the highest point in Vaud at 3,210 meters above sea level (10,530 feet) and while visiting that tile I reached my highest elevation for this year during a hike with my friend Lillie and brother-in-law Daniel to the Dôme des Diablerets peak at 3,016 meters elevation (9,895 ft.). We took this photo at the top:
That hike included traversing over the Les Diablerets glacier, but that was on a flat, well-used trail; the tough part was climbing up there starting at only 1,300 meters. Fortunately, there was a cable car nearby to save our knees from the pounding of walking back down. This was one of only two occasions when I had to leave the bike at home because the entire route was a hike. Here’s the route, which you can see in more detail on Strava.
Extensive planning
I spent a lot of time making plans for how to reach every tile in Vaud reasonably efficiently and as much as possible by bike. I combined information from various maps and some local knowledge. The hardest part was deciding whether to reach a higher-elevation tile by climbing up from a certain valley during one ride, or leaving it until a different ride and using an entirely different access route from a different valley. Also, would it be better to access all of the higher tiles by staying up high and using more slow paths and trails or is it better to descend down and go back up further along to use more of the faster roads?
Tile hunting in the Alps is a massive three-dimensional puzzle and optimization problem that I find very addictive.
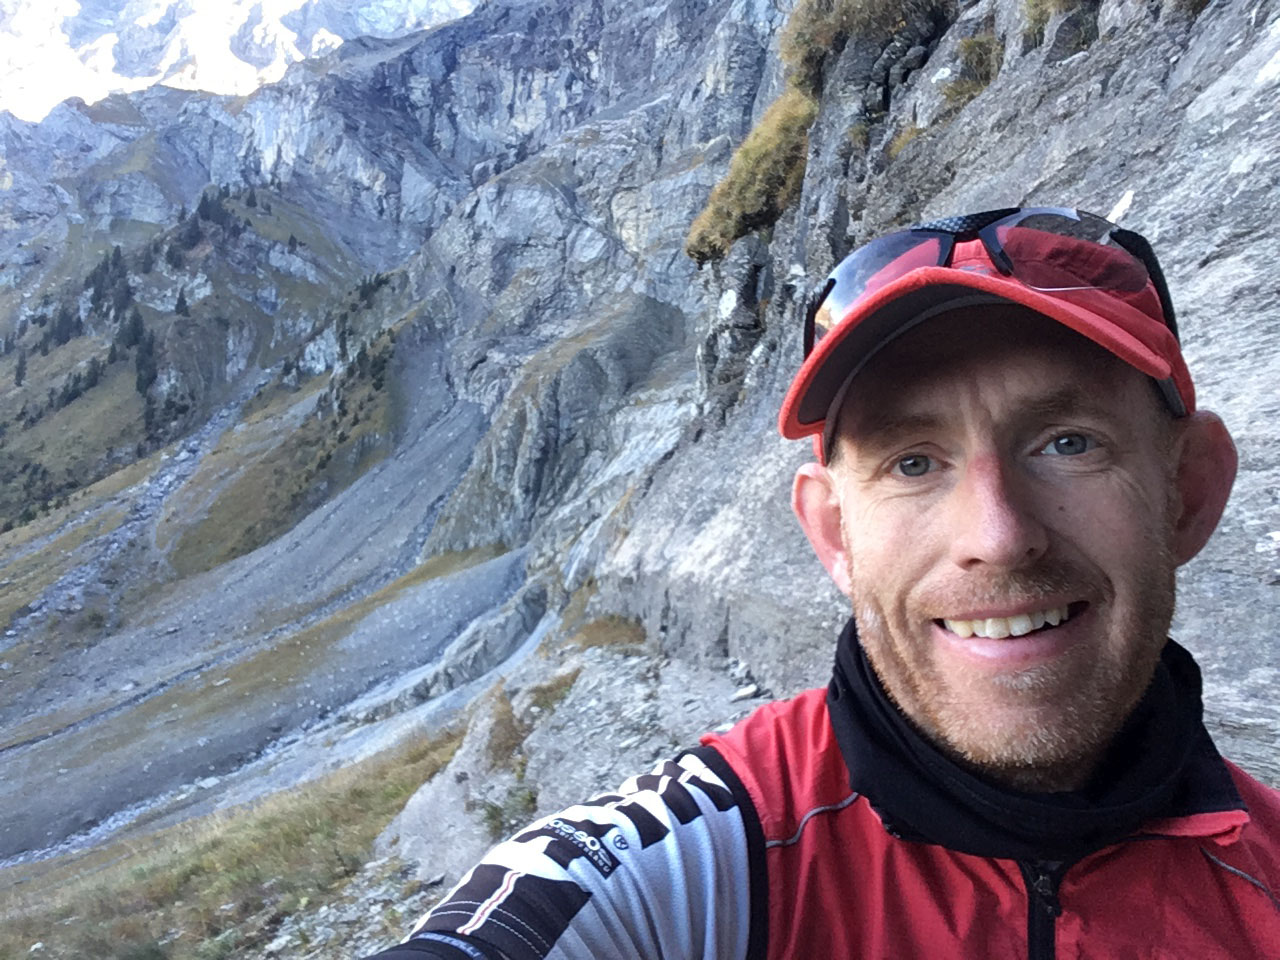
There is just one tile in Vaud in which there are no roads or official hiking trails. It’s along the northern edge of the Les Diablerets massif and I spent a lot of time looking at satellite images to decide which would be the easiest part of the tile to access. I thought about ignoring that tile, but eventually decided that I could ride to within 1.5 km of the edge and then hike across some fields then scramble up a scree slope and I should just make it into the tile before reaching the base of a cliff.
My track is shown in this Google Earth image or you can see the complete route on Strava.
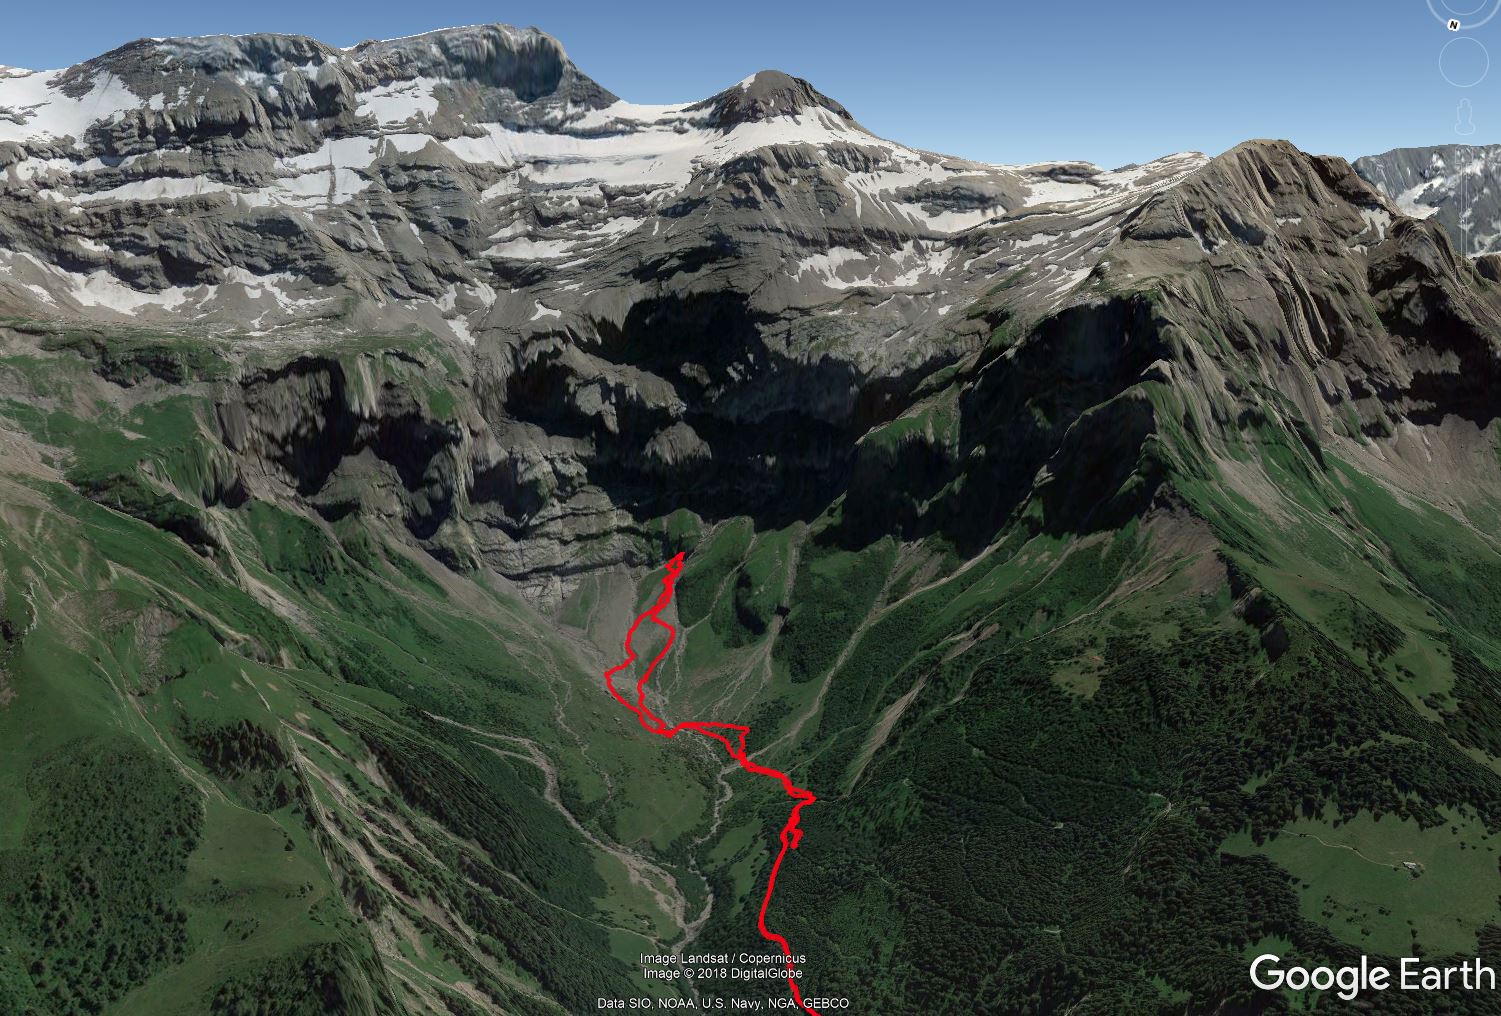
The terrain and scramble looked pretty daunting on the satellite images, so I was relieved that in reality it wasn’t too bad. I was immensely satisfied when my GPS showed my location to be inside the trickiest-to-reach tile in Vaud and I took my only selfie of the year:
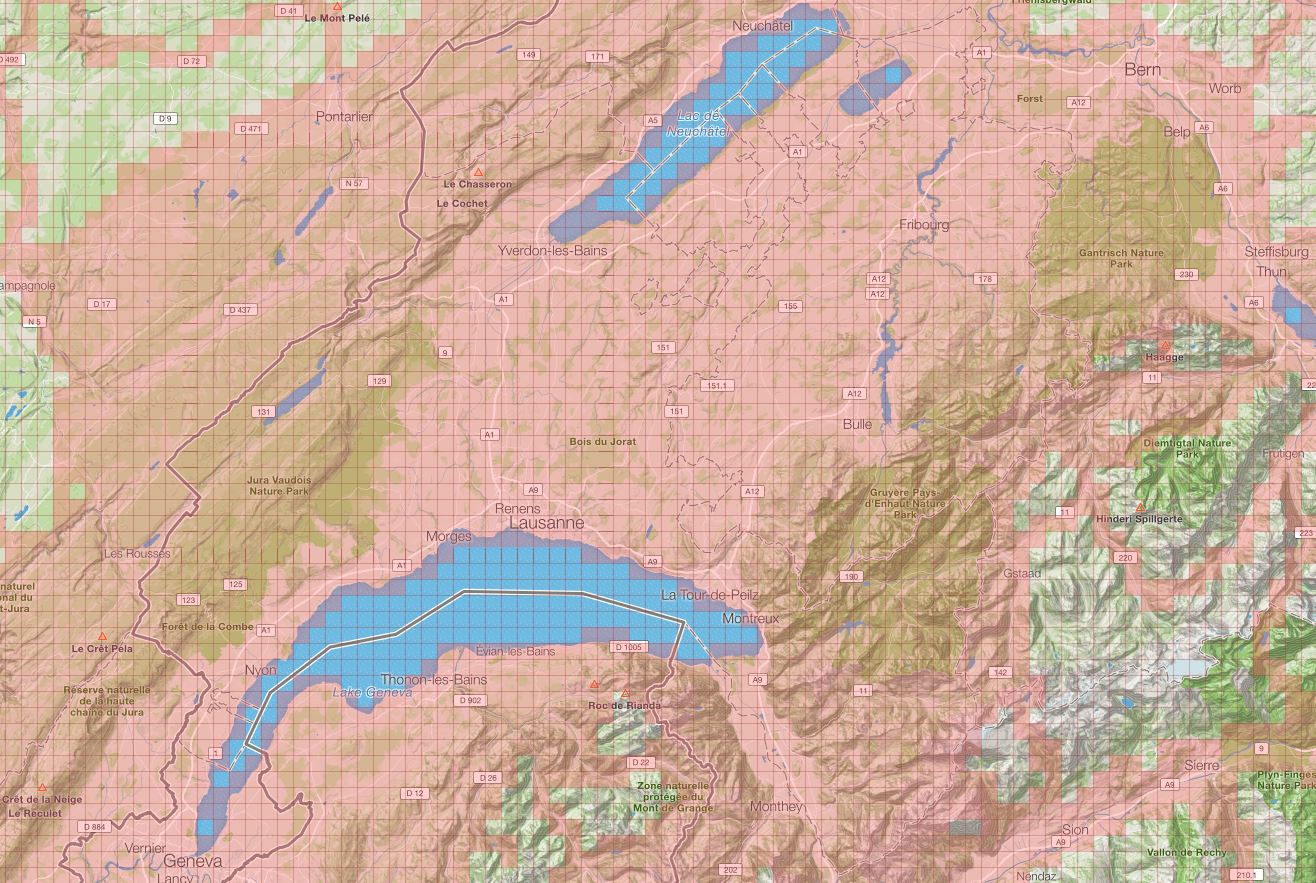
I obviously needed to visit many tiles that span the border between Vaud and the neighboring cantons of Bern, Valais and Friboug. I then realized that after visiting all of Vaud, I’d have very few tiles left in canton Fribourg, so I should try to visit all of the tiles in that canton at the same time. In the end, I finished Fribourg a few weeks before doing the final tiles in Vaud. I’ve therefore now visited all of the tiles in 4 cantons as well as visiting some tiles in every one of Switzerland’s 26 cantons and many in the surrounding countries.
Reflection
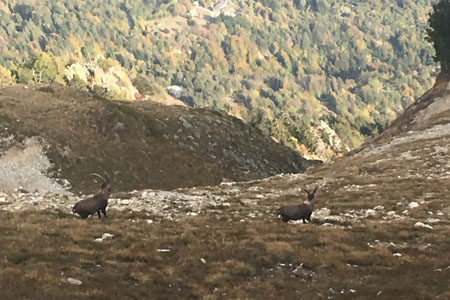
Focusing on the goal to visit all of the VeloViewer tiles in Vaud and Fribourg made me explore some incredibly beautiful valleys this summer that I would have otherwise never gone to. It’s also given me some more variety in my activities by doing more hiking than I’ve done for at least 10 years. Going to more remote places has also allowed me to see many wild animals, including the first ibex and snakes that I’ve seen in Switzerland for several years – special moments indeed.
Despite progress generally being quite slow on these kinds of rides, it’s kept me motivated to ride a lot. Now, with less than two months remaining in 2018, I’ve ridden over 18,000 km and am on schedule to achieve another goal for the first time, which is to ride more than 20,000+ km in one calendar year (in the previous 8 years, my total has been between 11,000 and 18,500 km).
Here’s a map showing the rides in the Vaudoise and Fribourgoise Alps that I’ve done in 2018 and highlighting the map tiles that I passed through.
I didn’t bother to revisit many of the tiles that I’d visited in previous years, so here is another map showing every tile that I’ve visited since I started recording my rides with a GPS in 2011. If you click on it to zoom in then you can just see the cantonal borders marked with dashed lines, or refer to this map at Wikipedia.
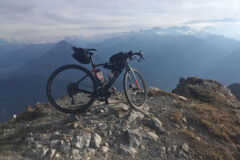
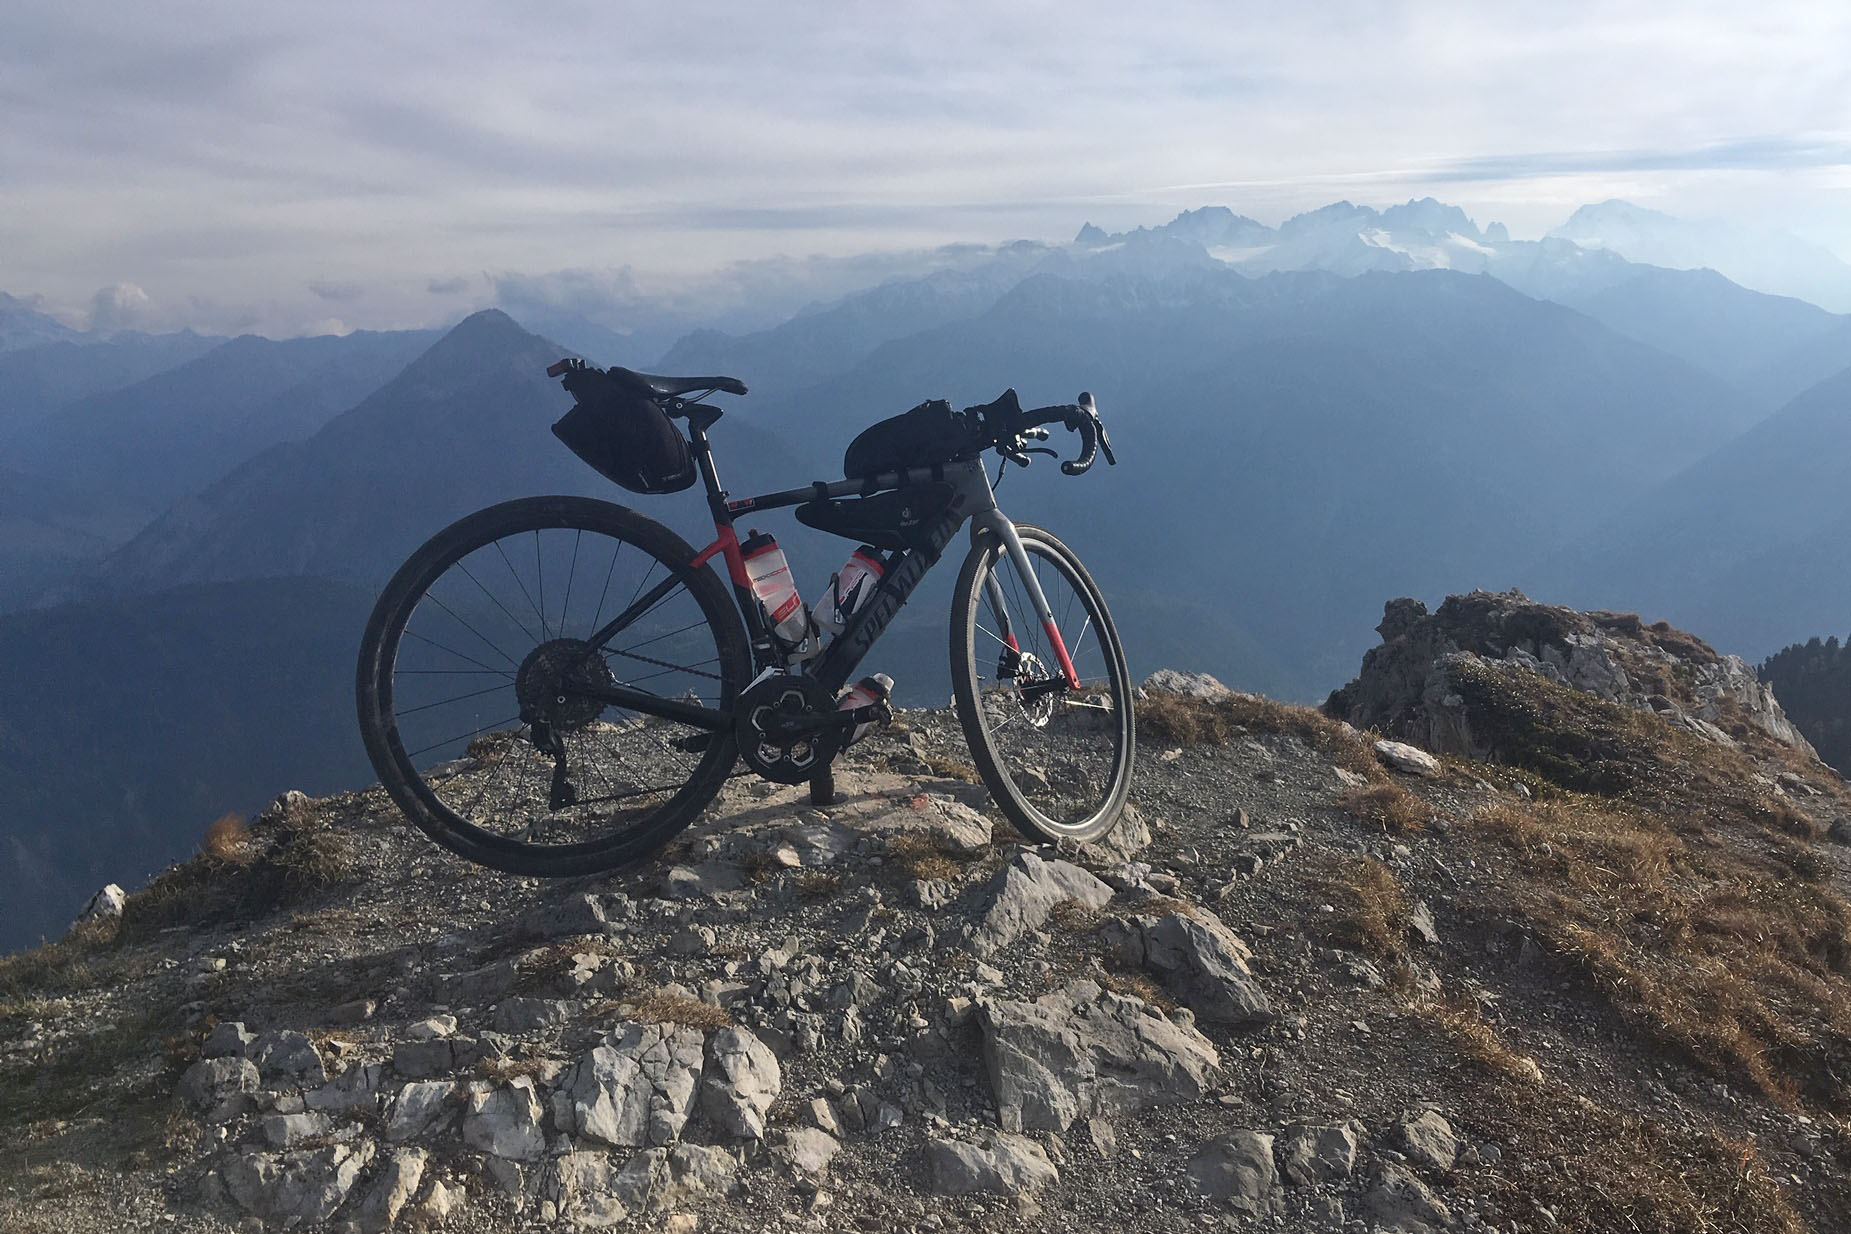
My ‘any road or trail’ bike: Specialized Diverge Future Shock
I’ve mostly been using my Specialized Diverge gravel bike for these rides, equipped with 40 mm wide tires. The Diverge has a mini suspension inside the steering column called the Future Shock that gives some comfort and helps to keep the front wheel on the ground during rough descents, which I’ve found to work quite well, see this post for more details. I also have a minimalistic aerobar mounted to the drop bars to make the long rides home a little easier after I’ve finished all the climbing.
On some sections of some rides, a mountain bike with more suspension and wider tires would have performed slightly better, but overall the gravel bike is the best tool for such a variety of terrain and the distances that I ride. I actually find the term ‘gravel bike’ is a bit too restrictive – I prefer the less catchy but more apt ‘any road or trail’ bike.
I normally bring 3 water bottles and have enough bags to carry the food and extra clothing that I need for a long day in the mountains – I find backpacks to be uncomfortable. Below are some more of the technical details about the bike because some people always ask, but you’re welcome to ignore this section:
Low gearing and mechanical disc brakes
My lowest gear is a 33-tooth chainring and a 42-tooth rear cog, which yields about 6.3 km/h at 60 rpm. That gearing allows me to keep pedaling even on sustained unpaved climbs of up to 20% gradient, when it gets steeper than that then I walk. My top gear of 46-11 gets me up to 55 km/h at 100 rpm, which is more than enough. I therefore have 14 well-spaced gears with a spread of 532%; the currently more fashionable single chainring setup with only 11 gears and 420% range would not be sufficient for my type of riding.
The derailleurs and shifters are Shimano Ultegra Di2 (6870) because they work so well and I can have shifters in multiple positions on the bars. I’m lucky that the bike’s stock derailleur hanger is long enough for the long-cage rear derailleur to shift to the 42-tooth cog without needing any modification – this would not be the case on most frames.
The brakes are Shimano cable-operated disc brakes (RS305) because I hate messing around with hydraulic fluid. Having cable-operated brakes does mean that I need to manually re-tighten the pads quite frequently as they wear down, so I wouldn’t recommend them for someone who doesn’t maintain their bike frequently.
Tires – tubeless and tubed
I’ve been using Schwalbe G-Ones tires, but they’re nothing special and I’d happily use many other similar models. For most of the season one tire has been tubeless and the other has had a tube inside due to an unrepairable hole. I have extremely mixed feelings about riding tubeless – it’s nice when it works, but it can be a lot of hassle to get it setup initially and it’s not entirely puncture-proof.
When the tubeless sealant and a tire plug don’t fix a puncture then you either have to throw away an otherwise good tire or use it with a tube, so what was the point in setting it up tubeless in the first place? Also, for the sealant to work well it needs to be changed every few months, which is generally more frequently than I get a puncture on any given tire. Finally, when you have a slow leak on a tubeless tire it’s difficult to determine whether the issue is with the tire, valve-rim interface, valve core, rim tape, etc.
I find inner tubes to be far more straightforward and because I prefer to run a decent amount of pressure in my tires, I very rarely get punctures. If I do get a puncture, changing the tube is much easier and cleaner when there’s an old inner tube to remove instead of liquid sealant.
In my experience, using a tubeless setup instead of a tubed setup has at least as many disadvantages as advantages. However, your preferences, experience and situation may be very different so you should use whatever you’re happier with. Just don’t blindly believe that tubeless is always better – it annoys me when people say that.
Do you need a specific gravel bike?
I’ve also ridden my road bike with skinny tires on some pretty rough dirt/gravel roads and occasionally on trails. You certainly don’t need to have a specific gravel bike to ride a variety of terrain – just ride what you’ve got, explore the world and enjoy yourself!
“just ride what you’ve got.” Yes! My first few years climbing super high unpaved stuff was on the cheapest of cheap hybrids. No worries, I had pedals and wheels that worked fine.
One thing I love with your tile obsession is how it makes you familiar with every part of the region where you live (and beyond). I am nowhere near as strong or as adventurous as you, but I enjoy exploring as much as possible … including trying to visit anything potentially fun locally. As your post clearly shows, exploring often pays fun dividends.
Thx for post
I remember seeing pictures of that hybrid bike on your blog and it showed that you were just riding for fun rather than to impress anyone. In terms of inspiring people to explore, my occasional reports are nothing compared to the wealth of info you’ve put on your Cycling-Challenge blog, so I should be thanking you rather than the other way around.
Got me addicted. Luckily in my canton of Basel its not too hard to do all the tiles!
A nice read thank you
Yep, I need to come visit you to finish another canton – Basel City is the smallest canton in the country at only 37 km2 and I’ve already visited 14 of the 29 tiles! Even if you include Basel Country it only ranks 18th in size (see Wikipedia), so probably no more than 2-300 tiles. Plus, riding all of the tiles in the Swiss Jura mountains is one of my next goals.