Bike repairs are explained that you should be able to perform on the road when doing self-supported bikepacking races and long-distance cycling. It’s best to practice these procedures at home before the event with the tools that you plan to take with you to make it easier when you are tired and stressed on the side of the road.
Page Contents:
Tires & Tubes
Inner Tube Replacement
When you have a puncture, simply removing the tire and inserting a new inner tube is not enough, you also need to diagnose the cause of the puncture to help avoid re-occurrences. Possible causes include a sharp object in the tire, a pinch flat, a valve problem, a rim tape problem, and poorly-adjusted brake pads rubbing away the tire’s sidewall. After removing one side of the tire, remove the tube but leave the valve in the rim and pump up the old tube to locate the hole and determine the cause.
If you find the hole and it appears to have been made by a sharp object then investigate the corresponding part of the tire to see if the object (glass, metal, thorn, etc.) is still there and use a pointy tool to prise it out, or push it out from the back. If the hole in the tire is large enough for a new tube to protrude through then you’ll need to install a tire boot between the tire and the tube (which could be a proper tire boot or could be some paper money or a food wrapper). If the hole is a pair of parallel lines, also called a snake bike or pinch flat, then it was almost certainly caused by the tube getting pinched between the ground and the rim, probably due to the tire being under-inflated, so just install a new tube and make sure you pump it up to a sufficient pressure. If the hole is on the rim side of the tube then check the rim tape in that area, which may need re-aligning to completely cover all spoke holes. If the rim tape needs repairing/reinforcing then you can use any tape available as a temporary fix, but it may not hold up to high pressure for a long time.
If you don’t find the hole then check the whole tire and rim for problems or sharp objects. See Sheldon Brown’s article for more details on these procedures and this Park Tool article.
Inner Tube Repair
The number of spare tubes that you’ll need in a bikepacking race is often more than you have (regardless of how many you bring), so bring some tube patches. I’ve had problems with pre-glued patches not working at all or failing after a day or two, so I now only use traditional patches and vulcanizing glue.
After finding the hole in the tube, use sandpaper to clean off the area to make the glue work better. After applying a small amount of glue and spreading it around an area larger than the patch, wait a few minutes for the glue to mostly dry before pressing the patch down firmly. Glue that was opened more than about a month ago won’t work properly anymore, so bring a new, unopened tube. This Park Tool article contains more detailed instructions.
Tubeless Tire Repair
If you are running tubeless tires and a small hole isn’t automatically sealed by the sealant then stop and move the hole to the bottom of the tire and put weight on it to slow the air flow and let the sealant work, or press on the hole with your thumb. If it still doesn’t seal then you can insert a tubeless plug (see the Tools & Spares page).
Slow leaks that develop in tubeless setups can be caused by leaky valves, so check that the valve core is well tightened. Hopefully you can then simply pump the tire back up to your preferred pressure, but if the tire has disconnected from the rim and you cannot get it to re-seal using only your pump, then you may be able to use an air compressor at a petrol/gas station if you bring a Presta-Schrader valve adapter or you could find a bike shop with a compressor.
There is one company making a portable, refillable air tank that is slightly larger than a water bottle that can be pumped up to pressure then used to re-seat tubeless tires (see this review at BikeRumor), but it weighs almost 0.5 kg and is quite bulky. Another option is using a CO2 cartridge, but they don’t always work, they must be disposed of afterwards, and the CO2 leaks out after a couple of days because the particles are so small, so the tire will need to be inflated again with regular air (see this article from DC Rainmaker for more information).
When a hole in a tubeless tire cannot be fixed, an inner tube can be installed, using the same procedure as with a regular tire, but the tire may be more difficult to unmount and mount than with a standard tire and rim.
Transmission
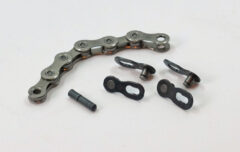
Chain Repair
A broken chain can be a massive problem without the correct parts and tools. You should therefore bring a few quick links and a chain tool; see this guide for tips. If you ever need to open a quick link without the proper tool or a pair of pliers then an extra derailleur or brake cable can be used, see this video.
Rear Derailleur Hanger Replacement
Derailleur hangers are designed to bend relatively easily to protect the frame and the rear derailleur during a crash or if the bike simply falls over. Minor damage and slight misalignment might not be immediately apparent, but when you shift into the larger cogs on the cassette after a crash then the rear derailleur may move into the wheel’s spokes and cause serious damage to the derailleur, wheel, hanger, and possibly the frame. You should therefore check the hanger and derailleur alignment after any bike fall and replace the hanger if it might be bent. Because each hanger is specific to a certain bike model (or small set of models), the correct one is normally difficult to obtain at short notice, so order one ahead of time and take it with you.
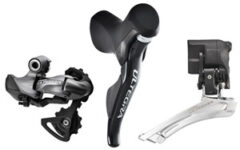
Derailleur Cable / Di2 Wire Replacement
Derailleur cables can brake at any time, so you should bring a spare. Note that Campagnolo shift cables have a head that is slightly smaller than Shimano’s and so either a Campagnolo-specific cable needs to be used, or in an emergency you can file down the head of a Shimano cable. The heads of Shimano and SRAM cables are the same, but the cable thickness varies slightly: 1.2 mm for Shimano and 1.1 mm for SRAM. Putting a standard/Shimano derailleur cable into a SRAM road shifter is possible, but it can be quite difficult to get the cable to make the tight bends inside the SRAM shifter, and shifting will require more hand force than if the correct cable is used. If you have electronic gearing, then I recommended bringing a spare Di2 wire that is the same length as the longest wire in your system.
If you have a frame with internal cable routing then always try to put a thin plastic guide tube over each section of the old cable before pulling it out of the frame, the new cable can then be inserted back through the same tubes; if this is not possible then some ingenuity and/or cursing may be required to get the cable to follow the correct path (see this Park Tool article). When replacing a Di2 wire on the road, it may be easier to route it outside the frame and keep it in place with zip ties or tape.
Brakes & Wheels
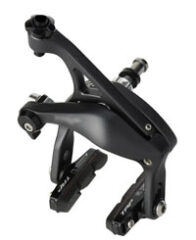
Brake Pad Adjustment & Replacement
Rim brakes normally have an adjustment knob where the cable housing enters the brake which can be unscrewed to compensate for wear, but make sure that the pads still contact the rim at the correct height and replace the pads when the wear line is reached (see this Park Tool article). Cable-actuated disc brakes should have a pad adjustment screw on each side of the caliper; hydraulic disc brakes should automatically move the pistons in to adjust for pad wear.
It’s more difficult to see brake pad wear with disc brakes, but they should generally be changed when there is less than 1 mm of material left on the backing plate or if there is too much lever travel that cannot be corrected by bleeding a hydraulic brake. When changing disc brake pads, the pistons need to be moved back to their initial position, which is easy to do with cable-actuated discs, but can be tricky with hydraulic discs – try using a tire lever to separate the pistons fully before putting the new pads in (see this Park Tool article).
Rim / Rotor Truing & Spoke Replacement
You should be able to correct minor problems with wheel trueness by adjusting spoke tension (see this Park Tool article) or truing a disc rotor (see this Park Tool article). Replacing a broken spoke is more advanced, but even if you don’t plan to do it yourself then bring the correct length spokes so that a bike shop along the way can perform the work. With certain designs of rear hubs, replacing a spoke behind the cassette is impossible without special tools (this is discussed on the Bike Wheels page), so a FiberFix Spoke may be the only solution.
Other
Nut & Bolt Tightening & Replacement
Carrying a few spares of common bolt sizes is a good idea, as well as a few bike-specific bolts that are difficult to obtain in regular stores. If a bolt is broken or lost and you don’t have a spare, then see if there is somewhere else on the bike that is less essential from which you can borrow a bolt temporarily. For instance, water bottle cage bolts are M5 and may work as a replacement seatpost-clamp bolt, stem bolt, etc. As a last resort, some bolts can be temporarily replaced with zip ties.
Headset Adjustment
If you choose to change the height of your handlebars at some point then you’ll need to re-adjust your headset, and you may also need to do so if you turn your stem to transport your bike, so see this Park Tool article.
Crashes
After even a small crash or if the bike just falls over, you should check that there is nothing wrong the frame, wheels, or components. The GCN video below shows what to look for. You also need to check yourself for injuries, which is covered at the end of the Avoiding Bike Crashes page.
Bike Shops
There are several other bike parts that could possibly break and cause a serious problem, but most things not mentioned here are things for which it is difficult to carry the spare parts or the tools needed. Car garages may be able to lend you certain basic tools, but for more specialist things you’ll probably need to find a bike shop. You could bring a list of bike shops along your proposed route, maybe one every 300-500 km, particularly in eastern Europe where it can be quite difficult to find a decent shop; doing this research at home can be a lot easier than trying to do it while on the road. Once the race has started, you shouldn’t ask friends or family to help you to locate a shop and you shouldn’t post a message on social media asking for assistance because this is outside the spirit of the rules and the ethos of unsupported cycling.
If your bike is un-rideable and you need to transport it to a bike shop that is too far away to walk then any means of transport is allowable as long as it is not arranged by people that you already know. Once your bike is rideable again, you should cycle back to the point where you took transport before continuing your ride.
Last significant page update: November, 2016
This page is in the Bike Maintenance section. The next page in this section is: