The variety of equipment used in bikepacking races means that the range of equipment costs is large, but estimates for reasonable options are given.
Page Contents:
Criteria for Choosing Equipment
Equipment costs are an indirect effect of doing bikepacking races because the equipment can be used outside of the race. For instance, a bike equipped for bikepacking is often an ideal bike to use for commuting, and so it could end up being a cost-saving investment rather than a direct cost of doing the race. It could also be used for many other races in the future.
Several of the other sections of this website contain advice on how to choose the equipment that will work best for you (see the Bike & Bike Components and Bike Accessories pages). Even though spending a lot of money buying new equipment is normally not necessary, that is what many people end up doing, so this page supplements the other equipment pages by including ranges of prices that may be spent on each category.
There is no need to spend a lot of money on equipment. Many people have done extremely well in bikepacking races using quite basic and low-cost equipment, much of which they already owned beforehand. Other people may already own all of the high-end gear that they need because they’ve previously done a lot of this style of cycling. Still others may own almost nothing appropriate and are basically starting from scratch. Hopefully this page will be useful to all of those people and everyone in between.
All values listed are rough estimates based on 2016 prices. The minimum prices are the lowest price for which a decent-quality, reliable model is available. The upper-end prices are not the maximum that could be spend, but are instead what I consider to be the most that is justifiable, beyond which the gains start to become minimal and normally only involve weight savings, which I don’t value much – see the Equipment Choice section at the bottom of this page.
Bike & Components
The bike will be the most-valuable individual piece of equipment. If the bike is comfortable, reliable, and can take your gear easily then that will be far more important than its weight, aerodynamic properties, frame material, components, etc.
There is a good chance that you already have a bike that is almost ready to do a bikepacking race or could easily be adapted, and that will certainly be the cheapest option. However, the temptation to get something new specifically for this purpose is often very strong. Finding something second-hand will save a lot of money, but it may be difficult to find something that is the right size, has the features that you want and is more appropriate than something that you already own. It’s often easier to find all of these properties by purchasing something new.

If you do decide to get a new bike then I recommend getting it from a local bike shop instead of online. The advantages of buying it from a bike shop are not only the individual advice and service that you’ll receive, but it may end up costing less money because you can normally have them change parts that are not appropriate on the stock bike like the gearing, saddle, stem, etc. for only the difference in the price of the parts, which may be nothing. With a bike bought online, all of these other items will cost extra, which may eat up all of the money saved on the bike itself.
Many people ask how expensive does the bike need to be? As is covered on the Bike Gear Shifting Systems & Derailleurs, due to the amount of use that the bike should experience, I recommend having a bike that is equipped with at least Shimano Tiagra components or the equivalent (SRAM Apex, Campagnolo Veloce, Shimano Deore). Fancy Frame materials (i.e., carbon and titanium) may be desirable but are certainly not necessary; aluminum or steel will be more than adequate if you have a limited budget.
A new aluminum or steel bike with Tiagra components or equivalent from a local shop is likely to cost €800-1000, or you may be able to get something similar second-hand in decent condition for €500, so this is the bottom end of the recommended bike budget. If you want the ultimate in functionality, then it would be a carbon or titanium bike with Electronic Shifting and some people want Disc Brakes, a new version of which will probably cost around €3000-5000. It’s easy to find a bike that is more expensive than this, but the main difference will be in the weight, not in the functionality, so the extra cost is very difficult to justify and should probably be spent on other things.
Other factors that differentiate bike models are more matters of personal preference than cost, including the type of Brakes (rim or disc brakes), Handlebar style (drop bars or straight bars), and the amount of tire clearance (narrow road tires only, something wider and a bit more comfortable, or space for Fenders/Mudguards), so all of these topics are covered elsewhere.
Some people, including myself, do so much customizing of the components on their bikes that it should make more sense to buy only the frame and fork separately and then buy the other parts individually. However, many large bike brands don’t offer frames and forks separately, and those that do often don’t offer them at a fair price compared to that of a complete bike. In addition, component brands charge bike brands a small fraction of the cost for individual parts that they charge consumers to purchase the same parts after-market. I therefore often find that it is cheaper to buy a complete bike that has the frame that I’m looking for with some of the parts that I need and then sell the parts that I don’t want either online or to people I know.
Having got the complete bike, you will probably want to customize some of the components and add some accessories, bags, and other equipment. Unfortunately, the total cost of all of these extras can easily come to at least as much as the cost of the bike itself.
Contact Points
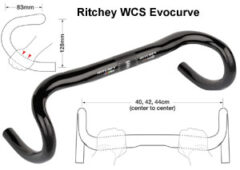
To achieve a sufficient degree of comfort, you may choose to change your bike’s Saddle, Handlebars and Stem. The cost will depend on the chosen models, but it could be €150-400 in total. In addition, when buying a new bike, the cost of Pedals also needs to be added, but €30-80 will get you a good, reliable pair and I cannot see the need to spend more.
Aerobars aid comfort and aerodynamics and so are virtually essential for ultracyclists. They come in many shapes and styles, with a decent pair costing around €200. Fit them as early as possible in training to get their position optimized for you and get familiar with and comfortable using them.
The minimum cost in this category would be a pair of pedals and aerobars, which could cost just €200. If you decide to change everything then you could spend €700.
Gearing
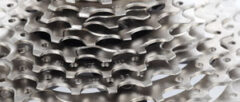
It’s advisable to have very low gears available to get up all climbs in an ultradistance race with a decent cadence, regardless of how steep they are or how tired you are. There is a page devoted to calculating what Gear Ratios you may need and the options available to achieve it. This may mean that you need to change your cassette (€20-50) and possibly rear derailleur (€30-60). Hopefully the crankset and chainrings on the bike are already appropriate; if not then this could add a further €100-200.
The total cost for this category is therefore between nothing if your bike is already appropriately equipped up to over €300 if you change everything.
Bike Repair
The Tools & Spares that I recommend bringing are all small-value items that can add up. A minimal kit would cost about €100 (including pump, inner tubes, patches, multi-tool, brake pads, chain links, derailleur hanger, spokes, and oil). I bring a more extensive set of tools and a few more spares and the total value of my repair kit is over €200.
Accessories & Equipment
Lights
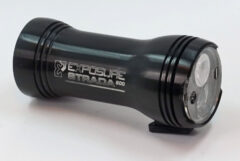
It would be difficult to finish a bikepacking race in a competitive time without doing a reasonable amount of riding outside of daylight hours. Even if you don’t initially plan to ride much in the dark, you should have a decent Headlights and other Active Lighting ready just in case.
Having only battery-powered lights is the cheaper option. A decent pair of front and rear battery-powered lights that will provide enough light even when riding reasonably fast and have plenty of battery life can be bought for around €120. Cheaper options are available, but this is not something that I would try to save money on. Light failures are always possible, so it’s best to have some basic backup/supplementary lights, so the total cost could be €150.
Battery-powered lights perform very well and many people have done bikepacking races using only those, but the majority of bikepackers prefer the piece-of-mind that having limitless dynamo lighting gives. A decent dynamo wheel with a hub that takes minimal energy when the lights aren’t on costs about €100; a more expensive hub and rim could increase the cost up to €300 (see the Bike Wheels page). A pair of powerful front and rear dynamo lights can cost from €80, with top-end options costing €200. Even for people using dynamo-powered lights, I would encourage them to bring basic battery-powered lights as a backup, adding an additional €30 or more to the cost. The total cost of a dynamo-powered lighting system is therefore €200-500.
Personally, I like to be prepared for everything because I’ve experienced all sorts of light failures before, so despite having a powerful dynamo-powered light setup powered by a custom-built front wheel being my primary lighting, I also have strong battery-powered lights as a backup, plus some other smaller battery-powered lights that I use as flashers to grab drivers’ attention. I estimate my entire lighting setup to be worth about €700, but this is slightly excessive.
Bags
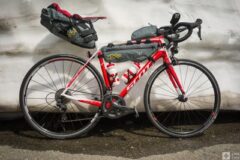
Using bikepacking-style bags is the most popular way to carry gear in these races, but see the Bags page to understand the various options and the advantages of each. A typical bikepacking setup involves a large bag that attaches to the saddle rails and seatpost and extends some distance behind the saddle, plus a frame bag running underneath the top tube, plus a bag on top of the top tube behind the stem. A set of these three bags from one of the major brands like Apidura will cost about €250. Further capacity is available by adding a bag in front of the handlebars for about €50 more.
I use a very different setup with a bag mounted on top of a rear rack, plus a few other bags in and around the bike frame that are from cheaper brands. Even though the cost of my setup is almost the same as a set of Apidura bags, at about €220, cheaper options are available that could make this only about €100. I therefore estimate the total cost for bags to be between €100 and €300.
Electronics
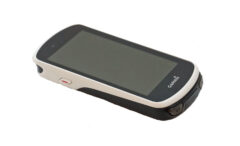
Many people have completed bikepacking races without using an electronic navigation device and only having paper maps or directions and maps printed from a mapping website. A lot of those people have commented on how much time they lost looking at maps and sometimes making wrong turns without realizing it. A Navigation Device with a pre-planned route marked is therefore a major time-saving device, probably saving more time than any other piece of equipment, as long as you know how to use it and have planned a good route beforehand.
Your navigation device could be a smart phone that you already own with off-line maps downloaded, and so this would basically have no extra cost except the cost of a compatible bike mount, about €30-40. Dedicated cycling GPS computers offer improved battery life and other features, but devices with full mapping capabilities cost €300-500.
You’ll need to have a method of keeping your phone and/or navigation device charged while doing very long days on the bike. There is a page on USB Charging Options, but the cheapest method is to buy a high-capacity USB battery pack for about €20-30. A multiple-outlet wall charger to charge everything when in a hotel is also useful, which should cost €10-20, although most people will already have a simple, single-outlet USB charger that may suffice. Devices to convert the power from a dynamo hub into a USB output are also popular, but they cost €100-150 in addition to the price of the wheel and create significant extra resistance on the front hub while in use, so they are not my preference.
The total cost of electronics and chargers is therefore between €50 (assuming that you already have a smart phone and charger) and €700. The cost of renting the Spot satellite tracking device that is needed for the race is typically included in the race registration fee, so that is part of the costs listed on the Bikepacking Race Costs & Budget page.
Sleeping Equipment
It’s possible to stay in hotels every night during some bikepacking race and so not need to buy any sleeping gear. Each person that does sleep outside has a different level of Sleeping Equipment that they are comfortable using. Comfort, weight, bulk, price, and setup time all need to be factored into deciding what is right for you; if you don’t have much experience then this is something that you should experiment with during training.
My own sleeping kit consists of a bivvy bag, a very light sleeping bag, and an inflatable sleeping mat. This has a total weight of 1.3 kg and cost a total of €400, but even more could be spent. It is reasonably quick to setup and pack away, and with it I can always find somewhere secluded to sleep comfortably. I’ve used this setup during training and racing more than enough to have saved far more money on hotels than it cost me to buy. Other people prefer to bring less sleeping gear, and plan to sleep in covered areas like bus shelters and may only bring a down vest that weighs under 200 grams and might cost about €100.
Even if you don’t plan to ever sleep outside, I would still recommend at the minimum carrying an emergency foil blanket (which only costs a few euros) just in case you can’t find a hotel, aren’t capable of riding any further and it is cold. The range of cost of sleeping gear is therefore from almost zero to €500.
Clothes
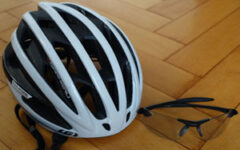
The final category of equipment is Clothing, and is again something that everyone adopts different strategies for. The basic setup includes Shorts, jersey, socks, Shoes, helmet, Gloves, and sunglasses. Even when choosing quite cheap models of each of these could easily come to a total of €300, but these are probably items that most people contemplating doing a bikepacking race already have. The amount of additional clothing for poor weather conditions is optional, but should at a minimum include a rain jacket, a decent model of which can be bought for around €100. Most people also bring at least some arm warmers, a second pair of socks, and one or two other small items, so the total value of a basic set of clothing is about €450. Obviously, it’s very easy to spend much more money to buy clothing that you are most comfortable with and is durable and versatile.
I bring more clothing than most people, including a second cycling outfit so that I always have something clean to put on at the start of the day even after sleeping outside, a few extra pieces for rainy and cool conditions, and even one or two pieces of off-bike clothing. The total value of all of my clothing is well over €1000.
Totals
I’ve given estimated budgets for each category of equipment above. Collecting these values together, I estimate that the total minimum amount that could be spent to obtain a complete set of equipment with which a bikepacking race could be completed without overly compromising comfort, practicality, reliability, or speed, and when starting with nothing, would be about €1550. These values are summarized in the table below:

As well as giving values for the minimum cost and an upper end, many people wonder what the typical amount is that most people spend on their equipment. Unfortunately, that is even more difficult to estimate, but I wouldn’t be surprised if the average participant used equipment whose total value was well over €5000 when including everything listed above. Of course, much of this is items that people already own or items that they buy for the race and plan to continue using afterwards, so these are not direct costs of doing the race.
A very rough estimate for how much most people spend on equipment with the primary goal being to use it during a self-supported, ultra-distance bike race is about €200-1500 for someone who doesn’t buy a new bike. This number must vary greatly between individuals based on how much gear they already have and what budget they have available. On the Bikepacking Race Costs & Budget page, I used the value of €800 as my best guess for what is most typical for people to spend on equipment when trying to calculate the total amount spent on a race (assuming that they don’t buy a new bike).
When trying to calculate how much money you might spend on equipment, another aspect to keep in mind is that you may buy some equipment with the intention of using it, but it may not survive your testing and evaluation. You may therefore end up buying something else instead. This can include high-value items like complete bicycles, which is a mistake that I’ve made myself and I know that I’m not the only one. Part of the costs of buying multiple versions of certain equipment can be recouped by re-selling unwanted items, but certainly not all.
Where to Spend Money
I finish this page with some general advice on what aspects to spend your limited resources on and what to focus on when choosing equipment.
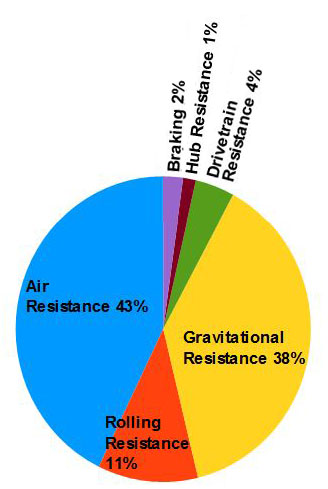
Nearly all cyclists place too much emphasis on the weight of their equipment because they wrongly believe that this is the primary determinant of their cycling speed and is a pure measure of the quality of their equipment. The analyses contained in the What Determines Cycling Speed? section actually showed that on the relatively mountainous route of the 2016 Transcontinental Race, weight/gravitational resistance was expected to make up only about 38% of the total resistance felt by an average-strength rider across the entire route whereas air resistance accounted for slightly more at 43%. Tire rolling resistance was third at 11% and mechanical resistance (bearings and drivetrain) followed at 5%; the remaining 2% was deemed to be due to braking.
Despite weight still being a major determinant of what is limiting cycling speed, making a significant improvement in this respect is extremely difficult because it is only the entire system weight (rider + bike + equipment) that matters, which is often around 85 kg (see The Actual Effect of Weight on Cycling Speed page). Spending more money on the bike and equipment to save weight will probably result in saving no more than 2 kg. A 2 kg weight saving will only cause speeds on steep uphills to increase by 2.5% (2/80 = 0.024), but when the entire route is considered including the downhill and flat sections, this would be an increase of less than 1% overall, or no more than 1.5 hours saved out of 160-180 hours of total cycling time. Is the extra cost needed to save 2 kg worth that small amount of time?
I previously made the mistake of spending money to reduce weight, but have since learned that this is not a good use of my resources. In addition, you can often save significant weight for free by not taking items that you don’t need, but don’t compromise comfort, practicality, reliability, or time efficiency, by doing so. Knowing what items are essential for you can only be learned through experience, so just go out and ride your bike lots to figure it out, which if you’re carrying any extra body fat can also help you to lose weight in another part of the equation.
Tire Rolling Resistance makes up a lot less of the total resistance experienced than does weight (11% versus 38%, respectively), but large differences and so significant time savings are much easier to make by choosing tires that have good rolling resistance than by reducing weight. Although rolling resistance must often be traded off against puncture protection, predicted total ride times using different tires can vary by over 5 hours! Using different tires is therefore one of the most economical but often overlooked ways of optimizing cycling speed, so choose wisely using the information and resources that I give on the Rolling Resistance page and keep your tires properly inflated.
Aerodynamics is the single most important factor in determining overall cycling speeds in bikepacking races (accounting for 43% of all resistance on the simulated mountainous 2016 Transcontinental Race route). However, this doesn’t mean that you should spend a lot of money on an aerodynamic frame and wheels, because the bike, components, and bags cause less than 25% of the total aerodynamic drag (see the Air Resistance of the Bike & Equipment page), the vast majority is caused by your body (see the Air Resistance of the Cyclist page).
Except on steep uphills, the aerodynamics of your body is the single most important factor in determining cycling speed. Making sure that you’re not carrying any extra body fat helps to reduce your air resistance as much as it does your weight / gravitational resistance. Also very important are things like wearing tight-fitting instead of loose-fitting clothing (each of which often costs the same amount of money) and shaving your arms and legs (which is practically free). Your body position also has a large effect on aerodynamics, so spend some time seeing what handlebar height and width you can comfortably use for days on end without needing to frequently sit up when getting tired (see the Riding Position page). Having a set of aerobars should increase both comfort and aerodynamics, which is why most bikepackers use them; however, you will need to spend some time adjusting them and getting used to the altered position and bike handling when on them.
Your equipment – Bags, Water Bottles, etc., also has a significant effect on your aerodynamic profile. There is not much solid information/data on this topic, but using side panniers is certainly significantly worse than using bags that are in line with the bike or body. Even if you already have a set of touring panniers then it’s worthwhile investing in bags that mount in more aerodynamic positions, and there are options that don’t cost a lot of money.
Lastly, mechanical resistance (which includes Hub Resistance and Drivetrain Efficiency) doesn’t make up a large percentage of the total resistance, but it can be minimized for a relatively low cost. The most important factors are that you have a reasonably new chain that you keep clean and oiled and that your rear derailleur pulleys are models that roll on bearings instead of bushings (this makes far more difference than the model and weight of your rear derailleur, although better derailleurs are more likely to come delivered with better pulleys, this is something that can be changed easily).
Optimizing your cycling speed by minimizing the retarding factors of aerodynamics, weight, rolling resistance and mechanical resistance should help you to reach the finish faster. However, the variation between different rider’s speeds is nowhere near as important as that of another metric, the variation between different people’s percentages of time spent on the bike (see the section on Measuring Time Efficiency). The clock never stops in this race, so I recommend choosing equipment to optimize the amount of time that you can spend on the bike before focusing on aspects that affect riding speed. This means that Comfort, reliability, and practicality may be far more important than aerodynamics or weight.
Last significant page update: November, 2018

This is the final page in the Bike Accessories section, which is in Ride Far, Part II: The Bike.