Different styles of bikepacking bags are presented and how they can be mounted is discussed. In addition, the advantages of using fenders/mudguards for long-distance cycling and various ultra-light lock options are presented.

Page Contents:
Bags
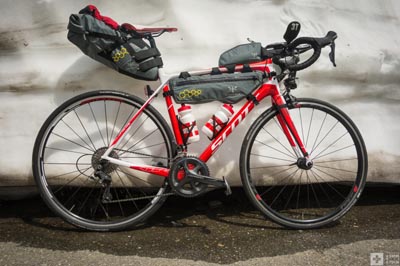
There are many ways to attach bags to a bike. Most people doing self-supported, ultra-distance bikepacking races use bikepacking-style bags that attach to the bike using Velcro straps. The advantages of these bags are that they are compatible with almost all bikes and are lightweight. Popular brands specializing in such bags include Alpkit, Apidura, Porcelain Rocket, Revelate Designs, and many others. Some larger, more general brands have recently started to offer such bags, including Blackburn Design, Ortlieb, and Specialized.
I cover bikepacking-style bags below, but there is also a good page on this topic at Bikepacker.com.
A backpack is another option that is reasonably light and doesn’t need to be attached to the bike. However, most people find that wearing a backpack while cycling for prolonged periods of time becomes very uncomfortable due to it putting strain on the neck and shoulders. It is therefore preferable to attach bags to the bike instead of the body. Minimal backpacks with hydration bladders are discussed on the Water Storage page.
People who are doing more relaxed bike tours more typically use pannier bags that attach to the side of racks that are bolted to the bike. The main advantage of these bags is that they offer more space to carry more stuff, but that is normally unnecessary for the amount of gear that bikepackers usually carry. The disadvantages are that the setup is heavier and side panniers are far less aerodynamic than bags that are in line with the bike and cyclist. The imprecise findings summarized on the Air Resistance of the Bike & Equipment page suggest that there is a difference of more than 1 kph in cycling speed between the two setups at typical bikepacking speeds, or at least half a day of elapsed time across a 4000 km-long route like the Transcontinental Race.
People doing bikepacking races at a more relaxed pace occasionally use touring panniers, but they are rare to see at such events, so I do not discuss them further, but I do try to cover all other possible options of how to mount larger, primary bags, plus smaller, secondary bags on the bike.
Primary Bags
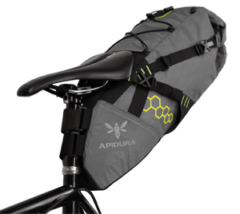
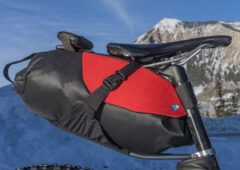
Bikepacking Bags / Seatpost-Mounted Bags
The primary bag in a bikepacking setup is a seatpost-mounted bag. Many brands offer multiple sizes, with the largest size being more appropriate for winter use when a lot of extra clothing and more bulky sleeping gear is needed. The small size works for people who are being very minimalist with their equipment, but the medium size is definitely the most popular.
Rack-Top Bags
Another option is to use a rear rack with a rack-top bag (aka trunk bag) mounted on top. If the rider is not too tall and so the saddle is not too high then a rack-top bag is somewhat hidden behind the rider, in a position similar to a seatpost-mounted bag. These bags can either be mounted on a conventional bike rack attached to the frame or to a seatpost-mounted rack.
There are several reasons why I’m in the minority of people in bikepacking races who prefers to use a rack-top bag instead of a seatpost-mounted bag. First is convenience because you can only access seatpost-mounted bags from the rear roll-up opening and everything is in one compartment, so many things are buried under other items. With a rack-top bag you can undo a zipper to access the entire main compartment from the top where everything is easy to access or you can access just the side pockets that are useful for keeping smaller items organized. Because minimizing time spent off the bike is just as important as cycling speed, I find that the extra convenience that a rack-top bag gives more than makes up for the slightly heavier total weight.
The second advantage of rack-top bags is that they are more stable than seatpost-mounted bags, which are designed to be as stable as possible, but they always sway around to some degree. Some of the latest designs of seatpost-mounted bags prevent swaying by having a metal frame bolted to the seatpost, (e.g., the Porcelain Rocket Mr Fusion v2, Specialized Burra Burra, PDW Bindle Rack, Bedrock RailWing). The WOHO Bike Xtouring is a frame that attaches to the saddle rails to add stability to any regaular seat-post mounted bag. Another disadvantage of seatpost-mounted bags is that they take up all of the space behind the saddle; if you put a rack-top bag on a rear rack then you have extra space behind the seatpost for an additional small bag (see below) and behind the seat for extra water bottles (see the Water Storage page).
Following the 2017 TCR, someone asked on the Facebook group (see post) which brand of bikepacking bags people were using. Apidura was the clear leader (one of the main race sponsors), with other options in the top 10 being Ortlieb, Alpkit, Revelate Designs, Carradice, Blackburn, Wildcat, Miss Grape, Specialized, and Restrap, in that order.
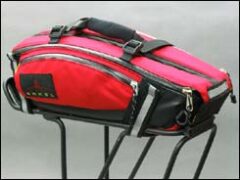
I’ve used a couple of rack-top bags: the Arkel TailRider (shown above) and the Topeak MTX Trunk Bag DX (Amazon), each of which has some advantages. It’s easy to put a rain cover over such a bag, and a fender can be put under the rack to protect the bag (and rider) from wheel spray (see the section below on Fenders).
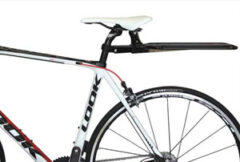
If you wish to use a rack-top bag then you must decide whether to use a rear rack attached to the frame or one that only attaches to the seatpost. The best seatpost-mounted rack is the Arkel Randonneur (shown on the right), which not only attaches to the seatpost but also to the saddle rails to prevent it from rotating and allows it to be used with carbon seatposts.
I prefer to attach my rack-top bag to a rear rack that is mounted to the bike frame because this is the most stable and leaves space behind the saddle and seatpost for additional bags or water bottles. The rear of the rack is an excellent place to mount a rear dynamo-powered light, something which is not so easy with some other bag setups (see the Active Lighting page). However, fitting a rear rack to many racing bikes is often not straightforward.
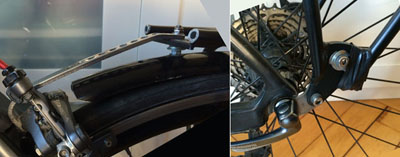
If you don’t have threaded eyelets / braze-ons to attach a rear rack to then you can often still use a rear rack with some modifications. If the frame has a flat area around the rear wheel dropouts, Tubus’ rear axle adapter kit can be used to attach the lower part of many rear racks using the rear quick release skewer (see image), or certain racks have this type of mounting system integrated. If you have a rear rim brake that attaches via a central bolt then this can be used as the upper attachment point (SJS Cycles sells a useful part for this that is drilled and can be bent into the perfect shape, as shown in the image), otherwise you may be able to change your seatpost clamp to one that includes threaded eyelets (search Google for “seatpost clamp rack mount”). The rear axle, rear brake mount, and seatpost clamp are parts that are already designed to handle significant loads, so the frame should be more than strong enough to take a rack with a small load in those locations, regardless of the frame’s material.
If your frame is made of metal (i.e., steel, aluminum, or titanium) then it may be possible to mount a rack using ‘p-clamps’ that can be strapped around the tubes to provide mounting holes. This should not be done with carbon frames and is not advisable with metal frames that use particularly thin tubing (i.e., many aluminum racing bike frames). Another option is the Thule Pack ‘n Pedal rack that straps onto the seat-stays of any bike.
Top-Tube Bags
It’s good to carry some food where it can be accessed without getting off of the bike, for which a top-tube bag behind the stem works really well. Some people use food bags mounted on the side of the stem and behind the bars, but that may interfere with the knees when standing up to pedal.
Top-tube bags that are designed for triathletes are often slim with very simple closures. Top-tube bags that are more bikepacking-oriented are larger and have more substantial zippers. The bikepacking-specific bag brands listed at the top of this page all do top-tube bags, but I’ve been happy with the Topeak Fuel Tank (Amazon, pictured on the right), which is not too expensive. Top-tube bags can often rotate or flop to the side, which I avoid by putting half of a strap-on bottle cage mount from Decathlon around the frame that I bolt the bag onto to prevent it from moving.
Bags designed to go in front of the seatpost, on top of the top-tube are also available and are often called “jerry cans”. I tested such a setup by putting something very narrow in that position but my thighs rubbed it all the time when pedaling. I know that other people don’t have this problem, but I recommend checking the clearance when pedaling before buying such a bag.
Frame Bags
It’s convenient to have clothing for changeable weather conditions within easy reach while on the bike and so a frame bag can be really useful for such items (see the Bike Clothing page). Frame bags come in a variety of shapes and sizes. The frame bags sold by bikepacking brands generally go underneath the full length of the top tube and are about 12 cm tall. These work great for people with medium to large frame sizes, but for people like me with a small frame (52cm), they often block most of the space for water bottles and are generally not a very efficient use of the more limited space. See the Water Storage page for options of how to mount bottle cages lower down than normal to allow larger bottles to fit at the same time as such frame bags.
Some bikepacking bag brands now offer frame bags that fill the entire front triangle (e.g., Apidura) and incorporate an opening for a hydration hose to come out of so that hydration bladders can be stored inside as well as other items. Those are offered in a few standard sizes, or custom bike bag makers (e.g., Porcelain Rocket) can make bags that fit a specific frame perfectly (or you can make your own, the materials can be bought online and there are YouTube videos explaining how to do it).
I actually prefer bags that fill the front two-thirds of the front triangle, and leave space behind for a vertically-mounted water bottle, but finding a bag of an appropriate shape and size is not easy. The best options I’ve found are some cheap models on Amazon (e.g., this one by Ibera and this one that is pictured above). Again, I prefer to have the bag bolted to the frame instead of using Velcro straps, so I put bolts through the bag into the regular bottle cage bosses in the down tube and use another Decathlon strap-on bottle cage mount under the top tube.
As explained on the Bike Frames page, frames with a sloping top-tube (compact geometry) give less space inside the frame than frames that have a more horizontal top tube, which can make a big difference to the amount of space available for a bag when using a smaller frame size.
Because I use a rack-top bag mounted to a rear rack, I have space under the saddle and behind the seatpost for a simple dry-bag in which I keep my small sleeping bag. The bag clips on and off using one of Topeak’s quick-release bottle cage mounts, which in turn is mounted to the seatpost using a pair of Specialized seatpost bottle cage mount brackets (shown in the image).
Some people find a way to store items behind their seat tube and in front of the rear tire. There is even a bag made specifically for this location made by gramm, but it may not fit in smaller frames.
Most bikepacking bag brands offer a bag that can be strapped in front of the handlebars. These work really well on straight handlebars, but on road bikes with drop handlebars there often isn’t much space for them. However, a simple dry-bag containing sleeping gear can often be strapped underneath a pair of aerobars.
Side pannier bags
Side pannier bags are very practical for carrying a lot of stuff, but they are very poor in terms of aerodynamics compared to bags that are in line with the bike and body. If you’re carrying enough stuff to need side panniers then you’re probably more in the bike touring mentality than in the bikepacking mentality and so things like time efficiency and riding efficiency probably aren’t particularly important.
I do use side pannier bags for certain styles of trip. In those cases I always prefer the easier access and organization of panniers with multiple external pockets and a clip-down flap closure rather than the more popular roll-down bags that are made from fully-waterproof materials. By putting rain-covers over my bags in heavy rain and having sensitive items inside additional bags, I’ve never had a problem with water damage, so I see no need to deal with the awkward entry and poor organization of the fully-waterproof pannier bags.
History of Bikepacking Bags
The GDR and TD were a major force behind the interest that developed in what became to be known as “bikepacking”. Bikepacking does not only refer to racing, but applies to any lightweight bike touring, typically using bags that attach directly to the bike’s frame, fork, and seatpost without needing bolted-on luggage racks. The word’s etymology is a combination of biking and backpacking.
The term bikepacking was originally only applied to off-road riding, but when road-based events were developed in which people used similar styles of luggage, the name “bikepacking races” was again appropriate for road-based, self-supported, ultra-distance bike races (and because bikepacking is a whole lot easier to say and write than that alternative).
Although the term “bikepacking” has only existed for about 10 years, carrying luggage on a diamond-frame bike without the use of racks has existed for as long as diamond-framed bikes have existed, although the popularity of such bags versus using bolted-on racks and side bags has fluctuated over time. Large saddle bags have been common in the UK for audax-style riders and traditionally-styled versions are still made by Carradice and Brooks.
Using a large bag that partially or completely fills the front triangle is also nothing new, with many examples visible on early military bikes. Such bags were still standard on military bikes until the last remaining cycling regiments in the Swiss Army stopped operating in the early 2000s, see the video below:
There is therefore nothing revolutionary about modern bikepacking bags, they are simply using more modern materials, construction techniques and refined attachment systems to create bags that are not so dissimilar to bags that have existed for as long as modern bikes have.
Fenders / Mudguards
It’s rare to see ultracyclists using any form of fenders / mudguards. However, due to the length of the races, rain is almost certain at some point. Fenders provide a massive advantage when riding in the rain because they keep your body and legs much drier, thereby keeping you warmer, which should allow you to stay on the bike longer and be more comfortable, both of which should allow you to reach the finish sooner. Fenders also keep your bags a lot drier, so you don’t have to worry about whether they are 100% waterproof. Having fenders even has an advantage when it’s dry because they keep your legs significantly cleaner due to being protected from the dust and dirt that gets kicked up by the tire.
There is research showing that fenders improve the aerodynamics of the bike (see here and here). The upper part of the wheel and tire travels at twice the speed of the bike itself and fenders can act as a fairing for this critical section. Null Winds have even developed such a product designed specifically to increase speed rather than deflect water and MotoGP motorbikes also have extensions over the front wheel for this purpose.
Unfortunately, it’s difficult to fit full fenders on many race bike frames (but see these BikeRadar and BikeRumor articles), but disc brake bikes tend to have a lot more space than rim brake bikes, and even some rim brake bikes have enough clearance (see this article and this article for options).

If the bike doesn’t have mounting points for fenders then there are certain fenders that will still work, including SKS RaceBlades, which come in multiple versions: Long (Amazon), XL (Amazon) and Pro (Amazon). Crud RoadRacers (Amazon) are my preferred model in this style. However, none of these are rigidly attached to the bike and are all a bit flimsy.
A far better and more solid, but significantly more expensive option are the Portland Design Works Full Metal Fenders (Narrow: Amazon, Wide: Amazon). These are simply awesome, see a review at road.cc; a custom-painted version is shown on a Saffron bike on the right, which is simply gorgeous. These fenders include mounts that clamp behind the wheels’ quick release skewers (not needed on the Saffron in the image) and on rim brake bikes the brake bolt is used for the upper mounting point. For the most integrated solution, see this custom carbon beauty by Stebles.
The 35mm-wide version of the SKS Bluemels fit on some road frames, but need some modifications to mount them. P-clamps or cable ties that have integrated mounting holes can be used for the lower mounting points (search Google for “cable tie mounting hole”), or the Portland Design Works mounts that go behind the quick release skewers can be bought separately. A centrally-mounted rim brake can often be used for the upper mounting point, possibly with the help of Sheldon Fender Nuts.
If using a rear rack then the rear fender can be attached directly to the rack so that fender stays are not needed. The rear-most section of a rear fender only serves to protect people riding behind you, which is obviously not important when doing solo bikepacking, so the rear section can be cut down; I cut mine down to a point approximately level with where the tire crosses the seat-stays.
Here’s a GCN video showing how to install SKS RaceBlades to a road bike:
And another testing how effective Crud RoadRacers are:
Locks & Mirrors
Bikepackers tend to not spend much time away from their bikes, but there are always times when it’s unavoidable when doing self-supported races. Although most of the time a lock shouldn’t be necessary, it’s still a good idea to use something small to stop opportunist thieves.
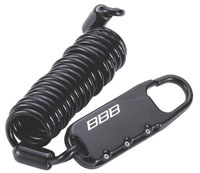
Any lock that gives a decent amount of protection will probably be a significant proportion of your total equipment weight, so the heaviest lock that I would recommend is something similar to the Knog Party Frank (Amazon) at about 200 grams or the Abus 1100 (Amazon) at about 140 grams, which will stop all opportunist thieves. My current favorite lightweight lock is the 30-inch version of the Ottolock – there is nothing stronger that comes anywhere near the weight of 150 grams and it’s reasonably compact and easy to find somewhere to store it. Many people opt for something even lighter like the BBB Microsafe (Amazon) at about 50 grams, see image on left, but that is obviously another step down in the level of security because it can be cut with a very basic tool.
Having a rear-view mirror mounted to the handlebars, helmet or glasses can occasionally be a very useful safety device, see the Other Safety Equipment for Cyclists page.
Last significant page update: November, 2016
This page is in the Bike Accessories section. The next page in this section is: